« back published by Martin Joo on September 14, 2023
Introduction
Kubernetes is probably the most frequently used orchestrator platform. It is popular for a reason. First of all, it has autoscaling. It can scale not just containers but also nodes. You can define rules, such as: "I want the API to run at least 4 replicas but if the traffic is high let's scale up to a maximum of 8" and you can do the same with your actual servers. So it's quite powerful.
It has every feature we discussed in the Docker Swarm chapter. It can apply resource limits and requests to containers as well which is a pretty nice optimization feature. It has great auto-healing properties.
So when you use Kubernetes it almost feels like you have a new Ops guy on your project. And in fact, it's not that hard to learn.
Basic concepts
These are the basic terms:
- Node is a server with Kubernetes installed on it.
- Cluster is a set of nodes. Usually, one project runs on one cluster with multiple nodes.
- Node pool is a set of nodes with similar properties. Each cluster can have multiple node pools. For example, your cluster can have a "standard" pool and a "gpu" pool where in the gpu pool you have servers with powerful GPUs. Pools are mainly used for scalability.
- Pod is the smallest and simplest unit in Kubernetes. It's basically a container that runs on a given node. Technically, a pod can run multiple containers. We'll see some practical examples of that, but 99% of the time a pod === 1 container. In the sample application, each component (such API, frontend) will have a dedicated pod.
- ReplicaSet ensures that a specified number of replicas of a Pod are always running. In Docker Swarm, it was just a configuration in the
docker-compose.ymlfile. In Kubernetes, it's a separate object. - Deployment: everyone wants to run pods. And everyone wants to scale them. So Kubernetes provides us with a deployment object. It merges together pods and replica sets. In practice, we're not going to write pods and replica sets but deployments. They define how applications are managed and scaled in the cluster. A deployment is a higher-level abstraction that manages Pods and provides features like scaling, rolling updates, and lifecycle management. It ensures that the desired number of Pods are always running and can be easily scaled up or down.
- Services provide network access to a set of Pods. They expose a given port of a set of pods and load balance the incoming traffic among them. Unfortunately, exposing a container (pod) to other containers is a bit more difficult than in docker-compose for example.
- Ingress and ingress controller are components that help us expose the application to the world and load balance the incoming traffic among the nodes.
- Namespaces: Kubernetes supports multiple virtual clusters within a physical cluster using namespaces. Namespaces provide isolation and allow different teams or applications to run independently without interference. Resources like Pods, Deployments, and Services can be grouped and managed within specific namespaces.
This is what it looks like:
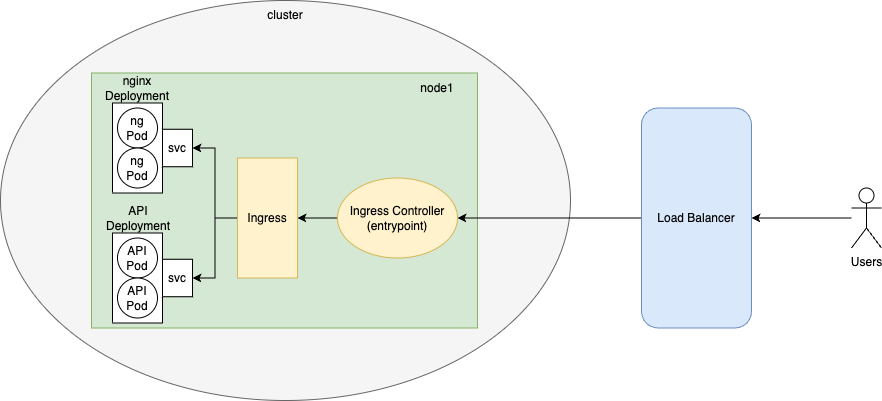
This figure shows only one node, but of course, in reality, we have many nodes in a cluster. Right now, you don't have to worry about the ingress components or the load balancer. The important thing is that there are deployments for each of our services, they control the pods, and there are services (svc on the image) to expose ports.
We'll have a load balancer (a dedicated server with the only responsibility of distributing traffic across the nodes), and the entry point of the cluster is this ingress controller thing. It forwards the request to a component called ingress, which acts like a reverse proxy and calls the appropriate service. Each service acts like a load balancer and they distribute the incoming requests among pods.
Pods can communicate with each other, just like containers in a docker-compose config. For example, nginx will forward the requests to the API pods (they run php-fpm).
I know it sounds crazy, so let's demystify it! First, a little bit of "theory" and then we start building stuff.
Pod
The smallest (and probably the most important) unit in Kubernetes is a Pod. It usually runs a single container and contains one component (such as the API) of your application. When we talk about autoscaling we think about pods. Pods can be scaled up and down based on some criteria.
A pod is an object. There are other objects such as services, deployments, replica sets, etc. In Kubernetes, we don't have a single configuration file such as docker-compose.yml but many small(er) config files. Each object is defined in a separate file (usually, but they can be combined).
This is the configuration of a pod:
apiVersion: v1
kind: Pod
metadata:
  name: api
spec:
  containers:
    - name: api
      image: martinjoo/posts-api:latest
      ports:
        - containerPort: 9000
As you can see, the kind attribute is set to Pod. Every configuration file has a kind key that defines the object we're about to create.
In metadata you can name your object with a value you like. It is going to be used in CLI commands, for example, if you list your pods, you're going to see api in the name column.
The spec key defines the pod itself. As I said, a pod can run multiple containers this is why the key is called containers not container. We can define the containers in an array. In this case, I want to run the martinjoo/posts-api:latest image and name the container api. containerPort is used to specify the port number on which the container listens for incoming traffic. We're going to talk about ports later. Right now, you don't have to fully understand it, it's just an example.
So this is a pod configuration. The smallest unit in k8s and it's not that complicated, actually.
ReplicaSet
A ReplicaSet is an object that manages pods. It defines how many replicas should be running from a given pod.
This is what the configuration looks like:
apiVersion: apps/v1
kind: ReplicaSet
metadata:
  name: api
spec:
  replicas: 2
  selector:
    matchLabels:
      app: api
It's not the whole configuration yet, but it shows you the most important things. It defines two things.
What do we want to run? It's defined in the selector key. This ReplicaSet is responsible for pods labeled as api. This is described in the matchLabels key.
How many replicas do we want to run? It's defined in the replicas key.
So this ReplicaSet runs two replicas of the api pod. But a replica set is an abstraction above pods. So it doesn't work this way:

So we don't need to define two separate objects. We can merge them together in one ReplicaSet config so the result is more like this:
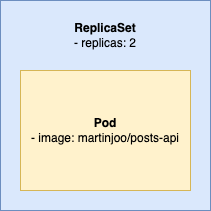
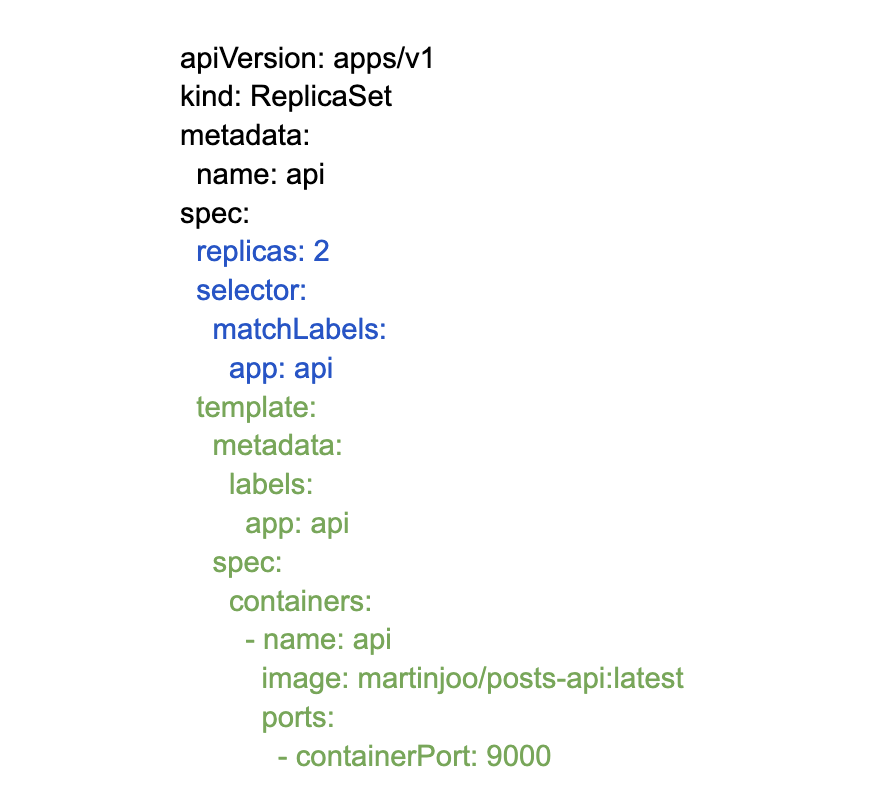
This means we need to define the pod inside the ReplicaSet config:
apiVersion: apps/v1
kind: ReplicaSet
metadata:
  name: api
spec:
  replicas: 2
  selector:
    matchLabels:
      app: api
  template:
    metadata:
      labels:
        app: api
    spec:
      containers:
        - name: api
          image: martinjoo/posts-api:latest
          ports:
            - containerPort: 9000
And this points out one of the most annoying things about Kubernetes config files: all of these labels and selectors.
This part:
selector:
  matchLabels:
    app: api
defines that the ReplicaSet is responsible for pods labeled as api.
And this part:
metadata:
  labels:
    app: api
labels the pod as api.
I know it looks weird in one small YAML config, but when we apply (run) these configs the ReplicaSet doesn't know much about YAML files. The Pod doesn't know much about them either. The ReplicaSet needs to take care of the api pods on hundreds of servers. The Pod needs to label itself as api so the ReplicaSet can find it.
Every config file contains this label and selector mechanism so you better get used to it.
Finally, here's a picture that might help you to understand the relationship between a Pod and a ReplicaSet:
The blue part is the definition of the ReplicaSet (what pod to run and in how many replicas). And the green part is the pod's definition (which image you want to run). And the black part is basically just gibberish for k8s.
Deployment
Now that you have read a few pages about Pods and ReplicaSets I have good and bad news:
- The bad news is that we won't use them. Not a single time.
- The good news is that everything you learned applies to deployments.
It looks like this:
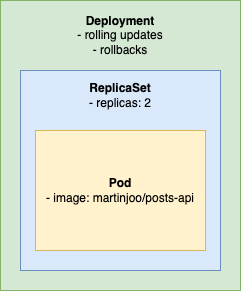
Deployment is another layer of abstraction on top of a ReplicaSet. It can define things such as rolling updates and rollback configs. This means:
- We won't write Pods and ReplicaSets but only Deployments.
- When deploying or rolling back we don't interact directly with Pods or ReplicaSets but only Deployments.
And fortunately, the YAML of a Deployment looks exactly the same as a ReplicaSet:
apiVersion: apps/v1
kind: Deployment
metadata:
  name: api
spec:
  replicas: 2
  selector:
    matchLabels:
      app: api
  template:
    metadata:
      labels:
        app: api
    spec:
      containers:
        - name: api
          image: martinjoo/posts-api:latest
          ports:
            - containerPort: 9000
I just modified kind to Deployment. Of course, a deployment can define extra keys (such as a rolling update strategy) but it's not important right now.
This whole article comes from my new 465-page book called DevOps with Laravel. In the book, I'm talking about:
- Fundamentals such as nginx, CGI, FastCGI, FPM
- Backup and restore scripts
- Optimization
- CI/CD pipelines
- Log management and monitoring
- Docker and docker-compose
- Docker Swarm
- Kubernetes
- Serverless and PaaS
- ...and more
Creating a cluster
I don't advise you to create a self-hosted Kubernetes cluster at all. The setup is quite complicated and you need to maintain it as well. The good news is that every cloud provider offers k8s solutions and most of them are free. It means that you don't have to pay extra money because you're using a k8s cluster. You just need to pay for the actual servers you're using. Just as if you rented a standard VPS, I'm going to use DigitalOcean.
The command line tool to interact with a cluster is kubectl. If you are using Docker Desktop you can install it with one click. Just turn on the Enable Kubernetes option in the settings:

This will install kubectl on your machine and it also starts a single-node cluster on startup. We're not going to use this cluster in this book. I think it's much better to just create a cluster in the cloud with the cheapest nodes and delete it after you don't need it. If you create a 2-node cluster the monthly cost is going to be $24. If you only use it for 5 day (for testing purposes) your cost will be around $4.
After you enabled k8s run this to verify it's working:
kubectl version --output=yaml
If you're not using Docker Desktop you can check out the official guide.
Next, go to DigitalOcean and create a new k8s cluster. In the pool configuration, there are two important things:
- Fixed-size or autoscale. If you choose a fixed size you'll have a cluster of X nodes. If you choose autoscale you can define the minimum and the maximum number of nodes. Your cluster will start with the minimum number and will scale up if needed.
- The number of nodes. For this demo project, I'm going to choose autoscale with 1-2 nodes.
This is my node pool config:
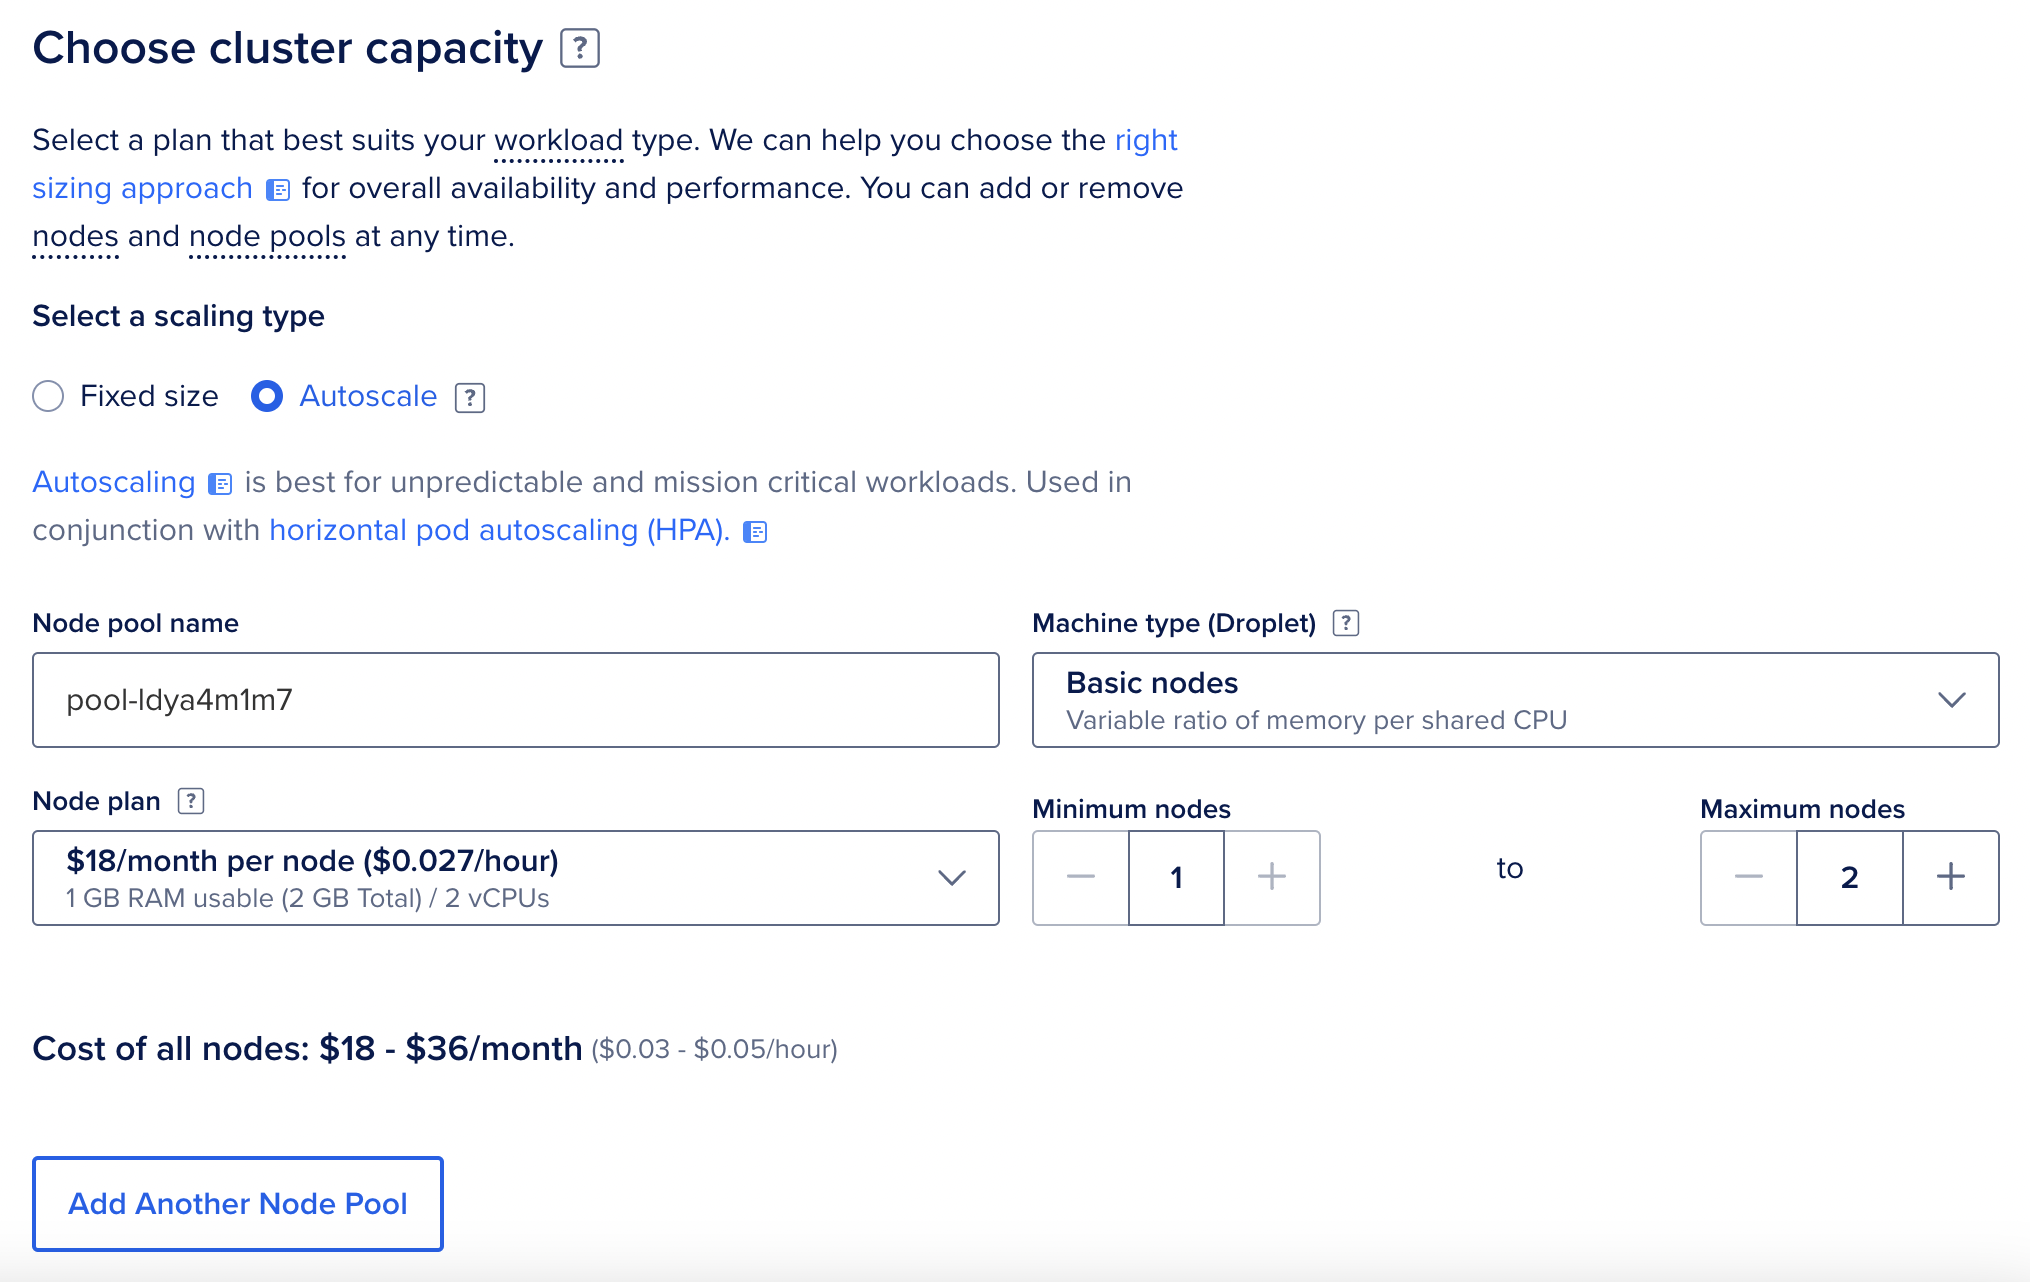
I choose the $18 nodes because they have 2 CPUs and they are a bit better (in a tiny 2-node cluster it's a huge difference, actually).
After the cluster is created you should see a page like this:
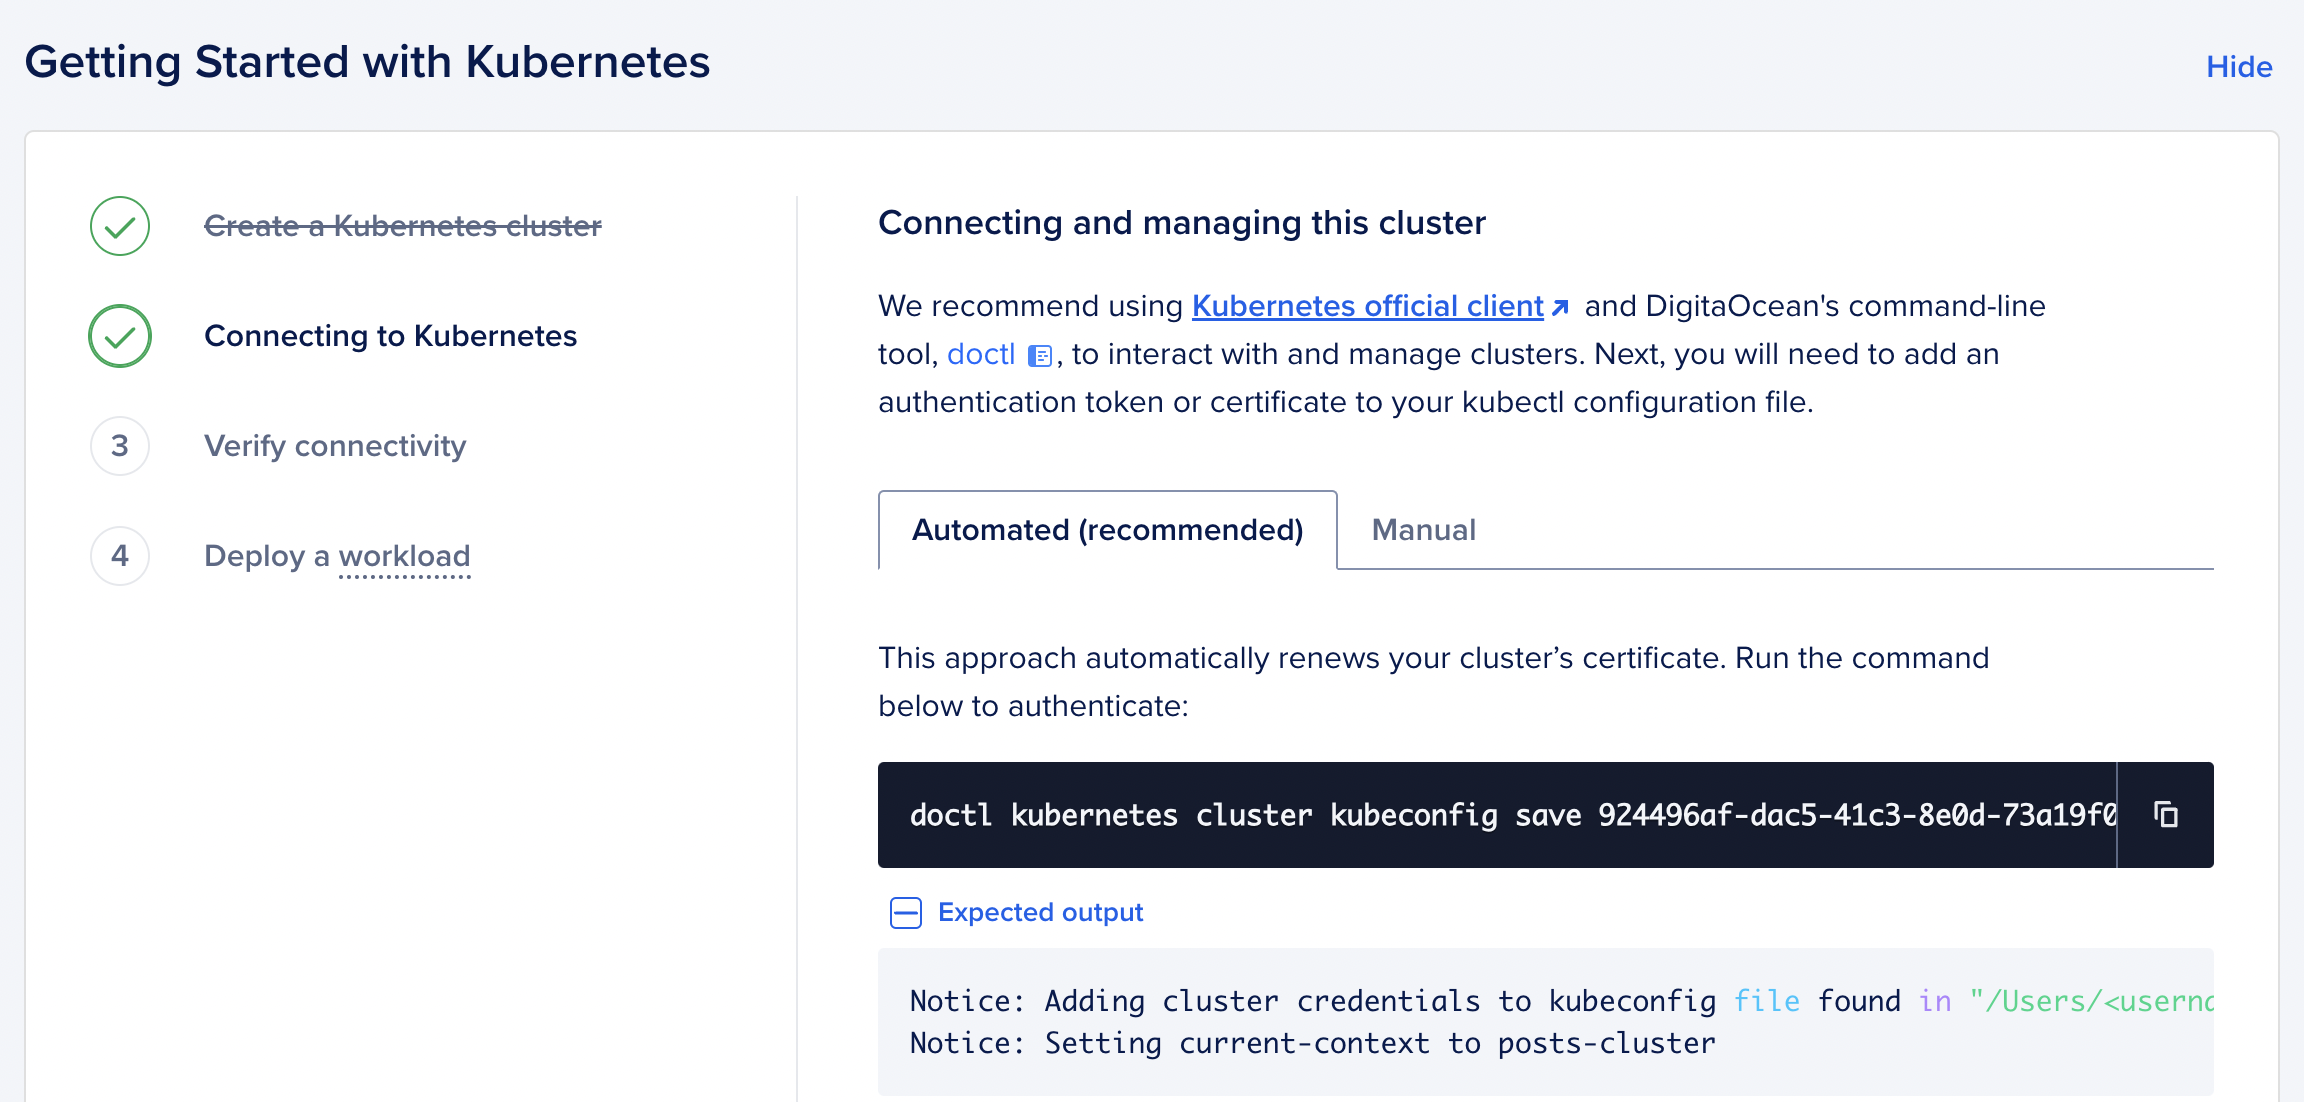
Run the command shown on the page:
doctl kubernetes cluster kubeconfig save <your-cluster-id>
It creates a file in $HOME/.kube/config and configures kubectl to connect to your new DigitalOcean k8s cluster.
That's it! Now you can verify if it works:
kubectl get pods -A
This should return a table with pods in the kube-system namespace.
Managed databases
I you haven't read the Docker Swarm chapter, please check out the first part of it (the one that talks about the state and also applies to Kubernetes).
Here's the TL;DR:
- A database has a state (the files that represent the tables and your data) and it's hard to manage this state in a replicated environment.
- k8s can't just place replicas of
mysqlcontainer to a random node because it needs the files.
The way we solved this issue was placement constraints in Swarm. k8s offers something called PersistentVolumeClaim and StatefulSet. The PersistentVolumeClaim create a volume that stores the data, and the StatefulSet handles the pod placement in a way that each has a persistent identifier that k8s maintains across any rescheduling.
But in this chapter, we're not going to host the database for ourselves. We're going to use managed databases. A managed database is a simple database server provided and maintained by a cloud provider. They have a number of advantages:
- You don't have to solve the state problem when deploying in a cluster
- You have automatic backups and upgrades
- The uptime is pretty good
- It's easy to increase the server size if your application grows
- It's easy to create a replicated database cluster (a master node and a read-only node, for example). Which is not that straightforward if you try to do it on your own.
- You have great dashboards and metrics by default
And of course, the biggest disadvantage is that you have to pay extra money. At DigitalOcean, managed MySQL databases range from $15 per month to $3830 per month. Similar pricing applies to Redis as well.
Just go to DigitalOcean and create a new MySQL server. After it's created you can manage the databases and users:
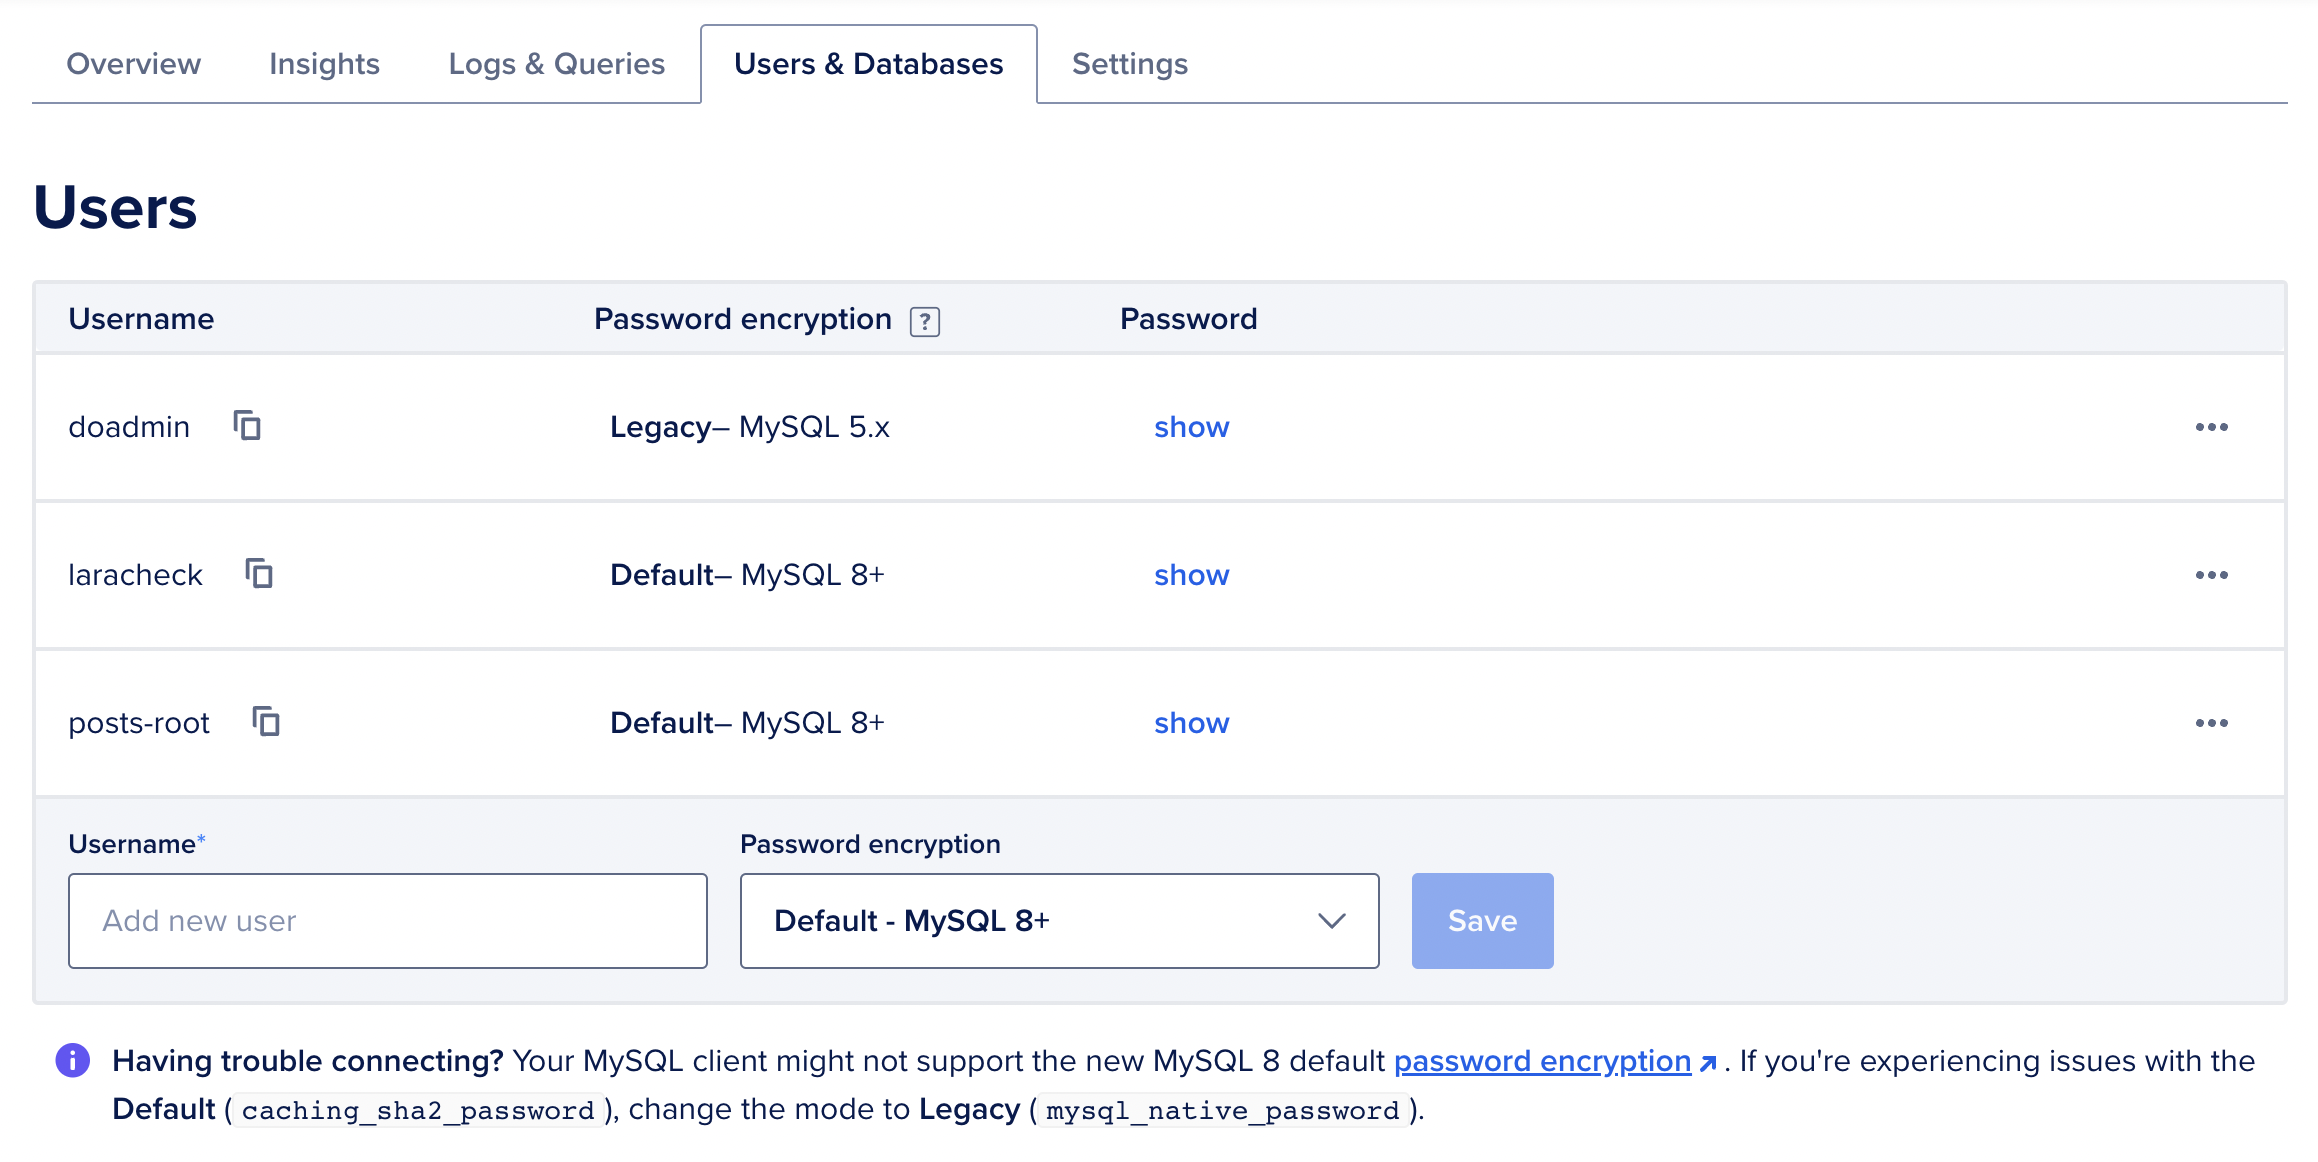
You have a default doadmin user. You can use that, or create a new one. I created a posts-root for only this project.
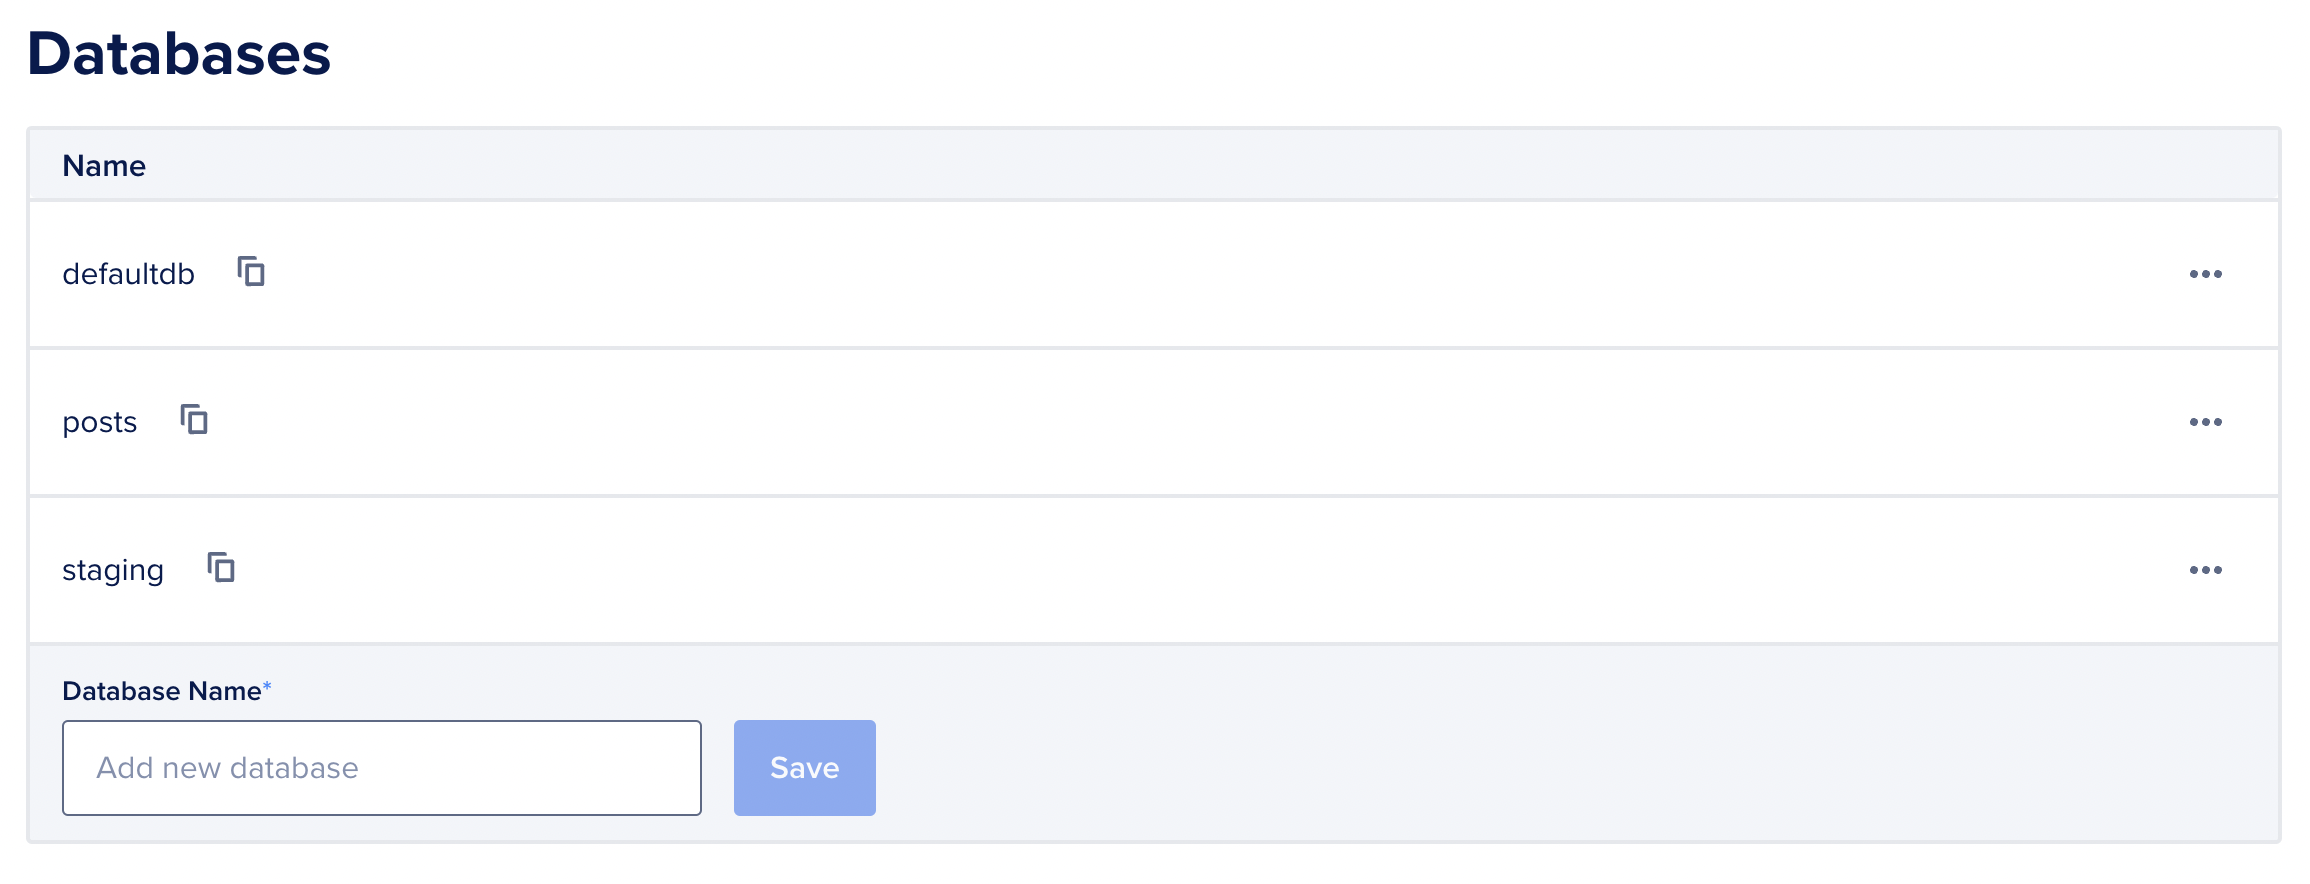
The server also comes with a default database called defaultdb. You can use that or create a new one. I created a new one called posts.
On the Overview tab they provide you with the connection details:
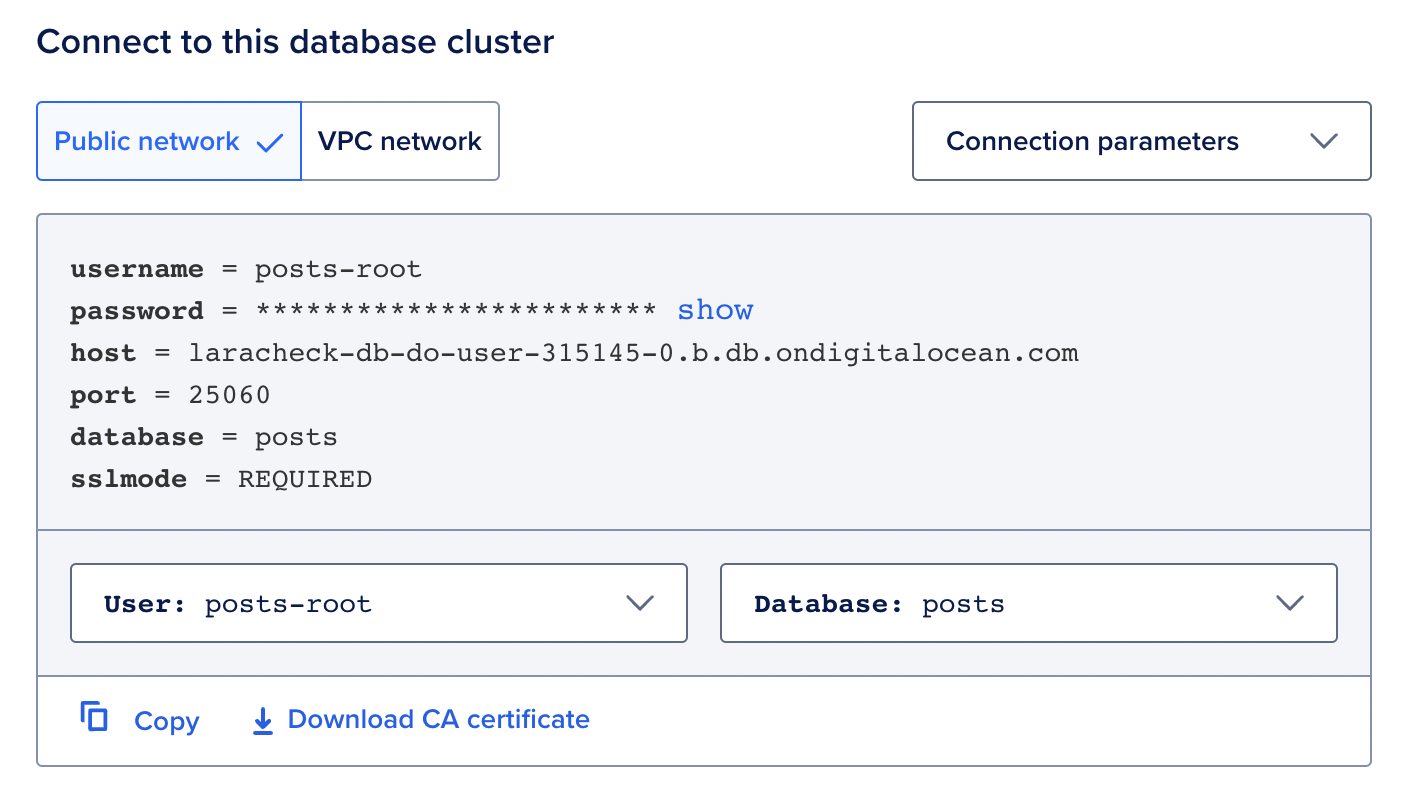
These are the environment variables we need to use later.
That's it. If you now want to try it, just set up these values in a random Laravel project and run your migrations. It should work.
One small thing. In the Connection parameters dropdown there's a Connection string option that gives a connection string similar to this:
mysql://<your-user>:<your-password>@laracheck-db-do-user-315145-0.b.db.ondigitalocean.com:25060/posts?ssl-mode=REQUIRED
It can be set in the DATABASE_URL environment variable. I'm going to use that since it only requires one environment variable so it's a bit more convenient.
I also created a Redis database server. It's the same process with the same steps. After it's created you'll have a connection string as well:
rediss://<your-user>:<your-password>@posts-redis-do-user-315145-0.b.db.ondigitalocean.com:25061
Now that the databases are ready, let's create our deployments!
Deploying a Laravel API
Configuring the deployment
Let's start with the API. I'm going to create k8s-related files inside the
/infra/k8s
folder. Each component (such as API or frontend) gets a separate directory so the project looks like this:
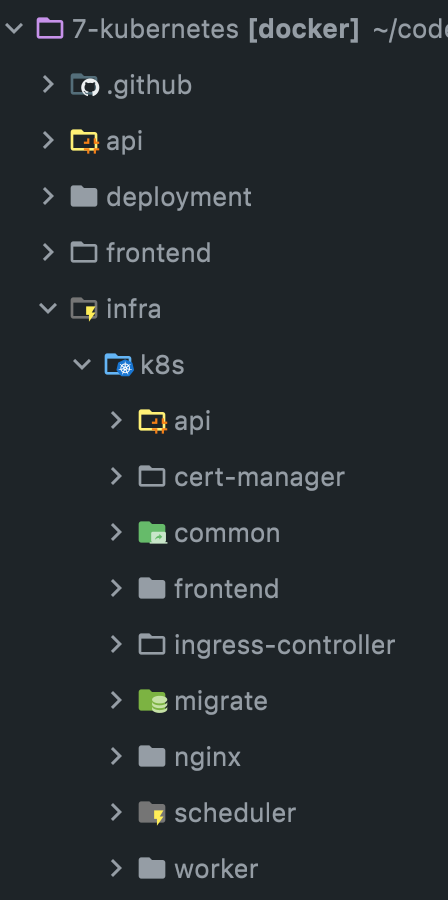
In the api folder create a file called deployment.yml:
apiVersion: apps/v1
kind: Deployment
metadata:
  name: api
spec:
    replicas: 4
  selector:
    matchLabels:
      app: api
  template:
    metadata:
      labels:
        app: api
    spec:
      containers:
        - name: api
          image: martinjoo/posts-api:latest
          imagePullPolicy: Always
          ports:
            - containerPort: 9000
You've already seen a deployment similar to this one.
The image I'm using is martinjoo/posts-api:latest. In production, I never use the latest tag. It is considered a bad practice. It's a bad practice because you don't know exactly which version you're running and it's harder to roll back to a previous version if something goes wrong since the previous version was also latest... And also, latest if you're using some 3rd party images, latest is probably not the most stable version of the image. As the name suggests, it's the latest meaning it has the most bugs. Always use exact versions of Docker images. Later, I'm going to remove the latest tag and use commit SHAs as image tags.
The other thing that is new is the imagePullPolicy. It's a configuration setting that determines how a container image is pulled by k8s. It specifies the behavior for image retrieval when running or restarting a container within a pod. There are three values:
Always: The container image is always pulled, even if it exists locally on the node. This ensures that the latest version of the image is used, but it means increased network and registry usage.IfNotPresent: The container image is only pulled if it is not already present on the node. If the image already exists locally, it will not be pulled again. This is the default behavior.Never: The container image is never pulled. It relies on the assumption that the image is already present locally on the node. If the image is not available, the container runtime will fail to start the container.
IfNotPresent is a pretty reasonable default value. However, if you use a tag such as latest or stable you need to use Always.
A note about containerPort. As I said in the introduction, exposing ports in k8s is a bit more tricky than defining two values in a YAML file. This containerPort config basically does nothing. It won't expose port 9000 to the outside world or not even to other containers in the cluster. It's just information that is useful for developers. Nothing more. Later, we're going to expose ports and make communication possible between components.
Configs and secrets
Before we can run the deployment we need to add environment variables to the deployment. In Kubernetes, we have two objects to handle environment variables: ConfigMap and Secret.
Create a new directory called infra/k8s/common and a new file called app-config.yml:
apiVersion: v1
kind: ConfigMap
metadata:
  name: posts
data:
  APP_NAME: "posts"
  APP_ENV: "production"
  APP_DEBUG: "false"

  LOG_CHANNEL: "stack"
  LOG_LEVEL: "error"

  QUEUE_CONNECTION: "redis"

  MAIL_MAILER: "log"

  AWS_BUCKET: "devops-with-laravel-storage"
  AWS_DEFAULT_REGION: "us-east-1"
  AWS_USE_PATH_STYLE_ENDPOINT: "false"
  AWS_URL: "https://devops-with-laravel-storage.s3.us-east-1.amazonaws.com/"

  FILESYSTEM_DISK: "s3"

  CACHE_DRIVER: "redis"
The kind is set to ConfigMap and data basically contains the non-secret environment variables from your .env file. Don't add passwords or tokens to this file!
And now we have to attach this config to the container:
apiVersion: apps/v1
kind: Deployment
metadata:
  name: api
spec:
    replicas: 4
  selector:
    matchLabels:
      app: api
  template:
    metadata:
      labels:
        app: api
    spec:
      containers:
        - name: api
          image: martinjoo/posts-api:latest
          imagePullPolicy: Always
          ports:
            - containerPort: 9000
          envFrom:
            - configMapRef:
                name: posts
envFrom and configMapRef are used to inject environment variables into containers from a ConfigMap resource we just created. envFrom is a field that allows you to specify multiple sources from which you can load environment variables. So we load the configMap resource named posts. If you remember we specified a name for the ConfigMap:
apiVersion: v1
kind: ConfigMap
metadata:
  name: posts
That's the name we are referencing in configMapRef. With this setting, all the values defined in the data key of the ConfigMap can be accessed by the container as environment variables.
Now we need to handle secrets as well. Create a new file called app-secret.yml in the infra/k8s/common folder:
apiVersion: v1
kind: Secret
metadata:
  name: posts
type: Opaque
...
The kind is Secret and the type is Opaque.
When you create a Secret, you can store different types of data such as strings, TLS certificates, or SSH keys. The Opaque type does not enforce any special encoding or structure on the stored data. It is typically used when you want to store arbitrary key-value pairs. So it's a good type for storing string-like secret values such as passwords or tokens.
And here's the content of the secret:
apiVersion: v1
kind: Secret
metadata:
  name: posts
type: Opaque
stringData:
  APP_KEY: "..."

  DATABASE_URL: "..."

  REDIS_URL: "..."

  AWS_ACCESS_KEY_ID: "..."
  AWS_SECRET_ACCESS_KEY: "..."

  ROLLBAR_TOKEN: "..."

  HEALTH_CHECK_EMAIL: "..."
Do this for only development purposes
Yes, right now we're storing database passwords and AWS access keys in raw format. Later, we're going to solve that, of course, but for learning purposes it's perfect.
We can use the Secret the same way we used the ConfigMap:
...
envFrom:
  - configMapRef:
      name: posts
  - secretRef:
      name: posts
Applying the deployment
And now you can apply the deployment and run the pods.
Every resource we configure in these yaml files needs to be applied with
kubectl apply
It will create an actual object from the configuration and run the pods if it's a deployment.
So let's apply the changes:
kubectl apply -f infra/k8s/common/app-config.yml
kubectl apply -f infra/k8s/common/app-secret.yml
kubectl apply -f infra/k8s/api/deployment.yml
If everything went well, you should see message such as this:
deployment.apps/api created
And now you can see the running pods in your cluster:
kubectl get pods
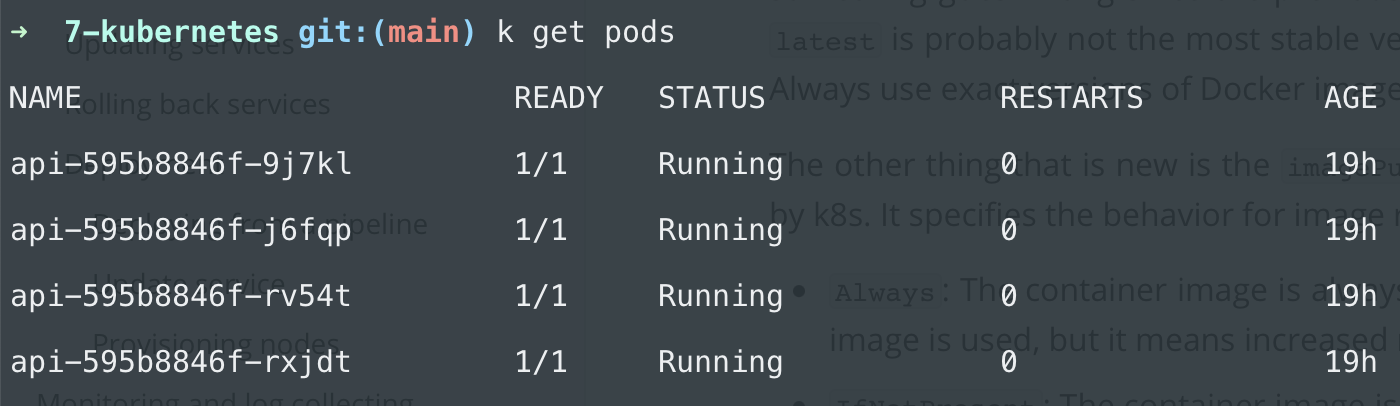
As we expected, the deployment created 4 pods because of the replicas: 4 setting. Each pod has the name api with a random identifier.
You can check out the logs of a pod by running:
kubectl logs <pod-name>
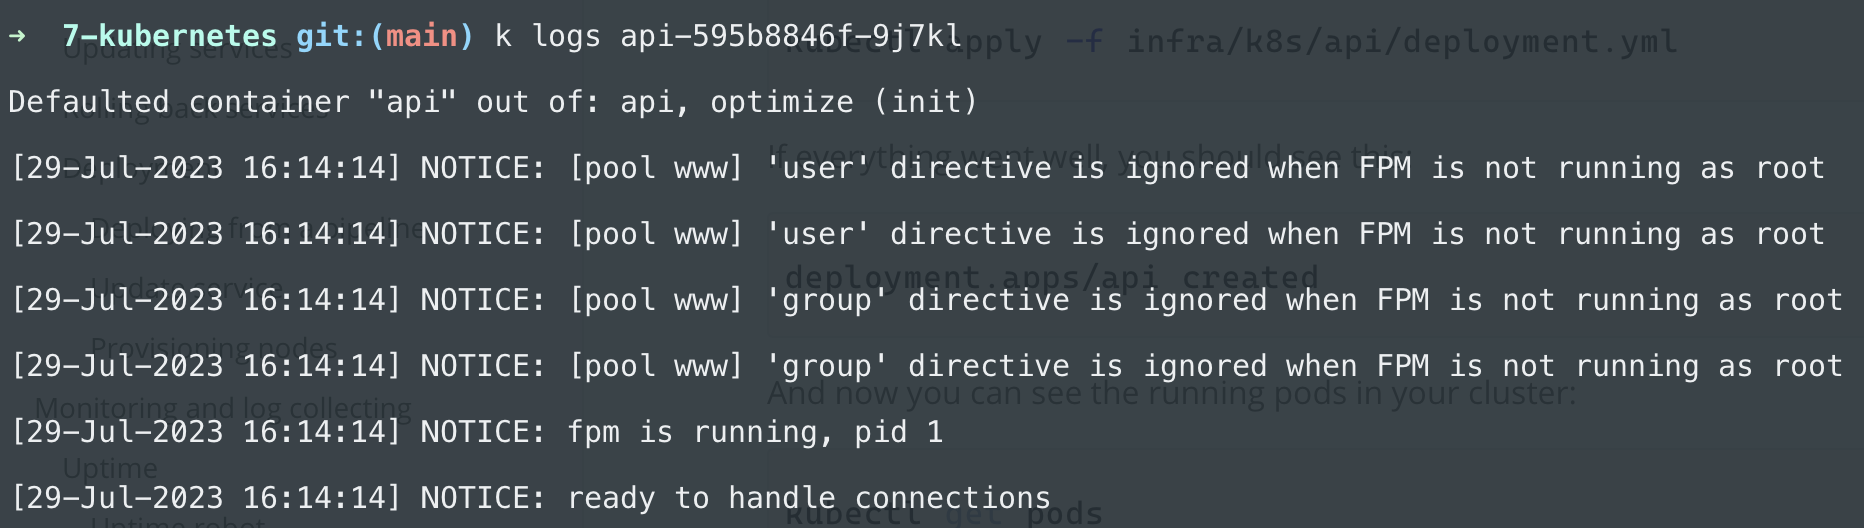
(Ignore the first line for now)
If you need more information about a running pod you can run
kubectl describe pod <pod-name>
It gives you information such as the image name, the config maps or secrets used by the container, and lots of other things.
You can also list the secrets or config maps:
kubectl get secrets
kubectl get configmaps
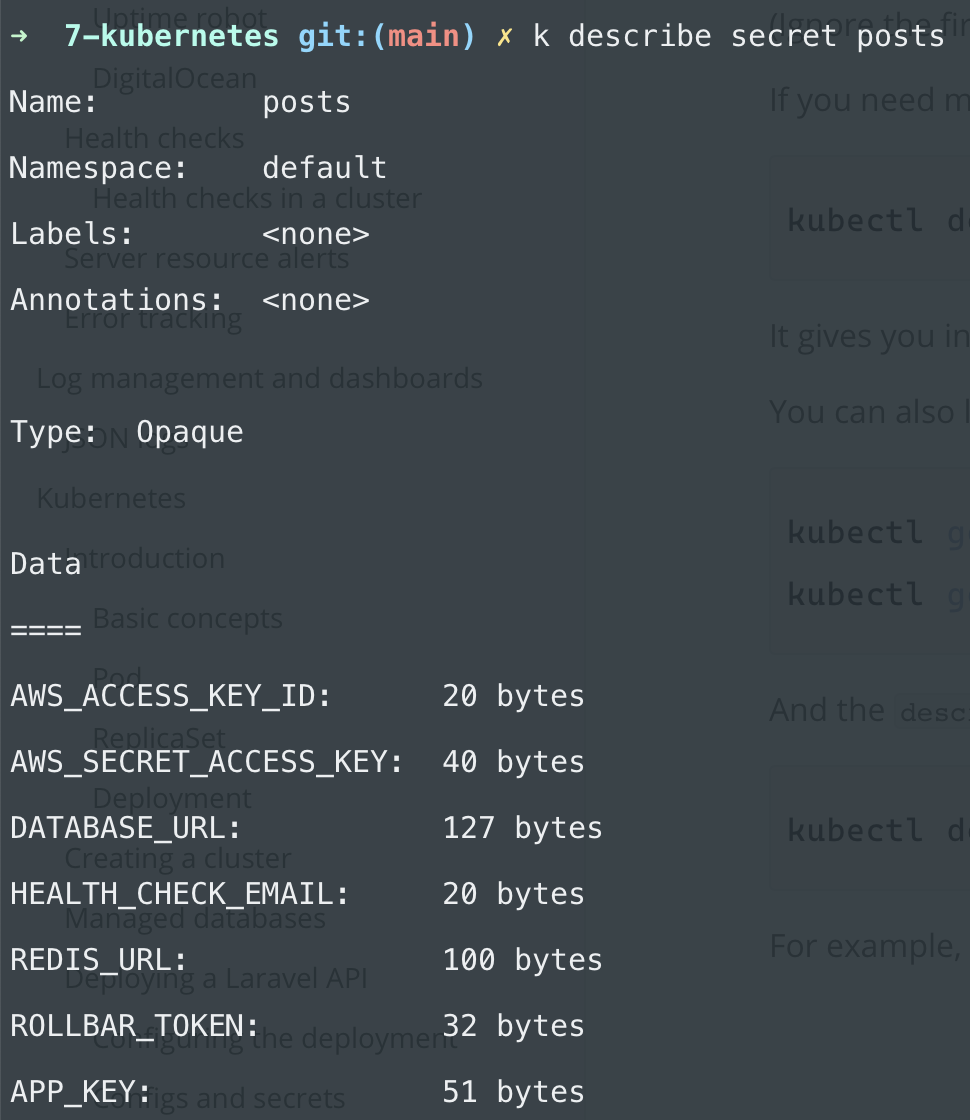
And the describe command can be used with a number of different resources in the format of
kubectl describe <resource-type> <resource-name>
For example, here's how you check the secrets available to the application:
kubectl describe secret posts
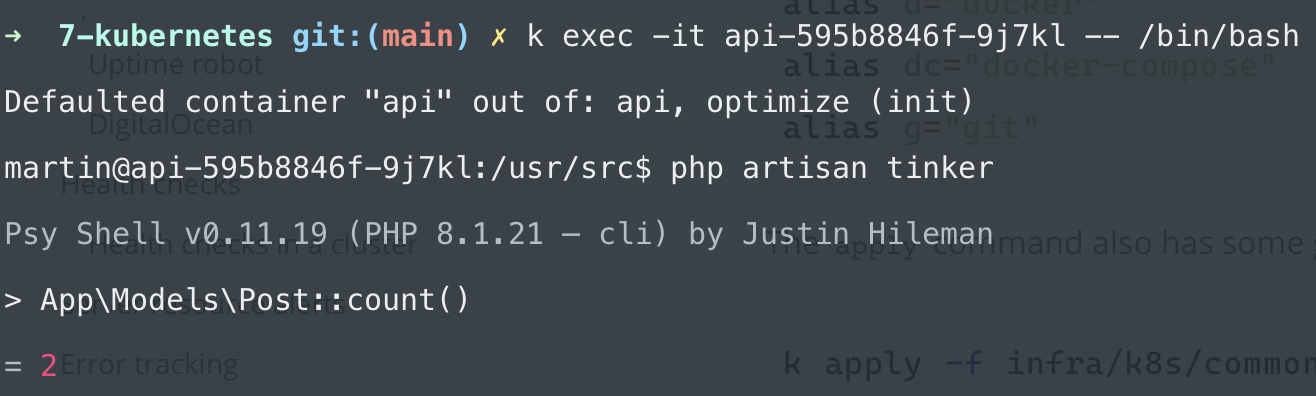
If you want to validate that the database works you can run artisan commands inside the pods by running this command:
kubectl exec -it <pod-name> -- /bin/bash
-it opens an interactive terminal session (just as docker exec -it) and /bin/bash runs the bash:
Shortcuts
First of all, you're going to type kubectl a lot. Make your life easier and add this alias to your .bash_aliases or .zsh_aliases file located in your home directory:
alias k="kubectl"
alias d="docker"
alias dc="docker-compose"
alias g="git"
The apply command also has some great features. For example, it can read a whole directory, so instead of these commands:
k apply -f infra/k8s/common/app-config.yml
k apply -f infra/k8s/common/app-secret.yml
We can just run this one:
k apply -f infra/k8s/common
It will read the YAML located in the common directory. It's not recursive so it won't fetch subdirectories.
However, there's a -R flag, so we can do just this:
k apply -R -f infra/k8s
This command applies everything located inside the k8s folder and its subfolders.
kubectl apply
apply is the most frequently used command so let's talk about it a little bit.
It creates and updates resources based on your current configuration files. When you run the command k8s checks the cluster and evaluates the difference between the current state and the desired state. The current state is, well, the current state of your cluster. For example, before you run the apply commands the current state was nothing. There were no deployments, pods, or config maps. When you first ran the command:
kubectl apply -f infra/k8s/common/app-config.yml
The desired state was to create a ConfigMap resource with the environment variables in your YAML file. So k8s created the resource. The same happened with the deployment and pods.
If you now change your deployment config, for example changing the image:
apiVersion: apps/v1
kind: Deployment
metadata:
  name: api
spec:
    ...
    containers:
      - name: api
        image: martinjoo/posts-api:1.0.0
And run apply again, you'll get a message such as this:
deployment.apps/api configured
configured mean the desired state was different from the current state so k8s configured your cluster and made the necessary changes.
apply is the recommended way of deploying applications to production so we're going to use it a lot.
Deploying nginx
The API cannot do too much on its own. It needs nginx so next we're deploying that component.
The deployment file is located in infra/k8s/nginx/deployment.yml:
apiVersion: apps/v1
kind: Deployment
metadata:
  name: nginx
spec:
    replicas: 2
  selector:
    matchLabels:
      app: nginx
  template:
    metadata:
      labels:
        app: nginx
    spec:
      containers:
        - name: nginx
          image: martinjoo/posts-nginx:latest
          imagePullPolicy: Always
          ports:
            - containerPort: 80
That's it. It doesn't need environment variables or secrets. And once again, containerPort is only for informational purposes as I explained in the API chapter.
We can apply nginx by running:
kubectl apply -f infra/k8s/nginx
Communication between nginx and FPM
The next step is to make communication possible between nginx and API. To do that we need a service.
Service is another kind of resource, and there are different service types but the one we need is ClusterIP.
ClusterIP is the default type for services and this is what we need right now. It is a service type that provides connectivity to internal cluster IP addresses. So it makes communication possible among pods. Internally, in the cluster. This is exactly what we need since we want to connect nginx and FPM using port 9000 exposed by the api container.
There are a few other services such as NodePort or LoadBalancer. We'll talk about LoadBalancer later. You can check out the other types in the official documentation.
Create a new file called service.yml in the infra/k8s/nginx folder:
apiVersion: v1
kind: Service
metadata:
  name: api-service
spec:
  selector:
    app: api
  ports:
    - protocol: TCP
      port: 9000
      targetPort: 9000
The kind is set to Service and the type is ClusterIP. Since ClusterIP is the default value I'm not going to explicitly write it down in the future.
The service target ports labeled as nginx are defined in the selector object. And then the important part:
ports:
  - protocol: TCP
    port: 9000
    targetPort: 9000
targetPort is the port listening in the container. And port is the one that is going to be exposed to other pods in the cluster.
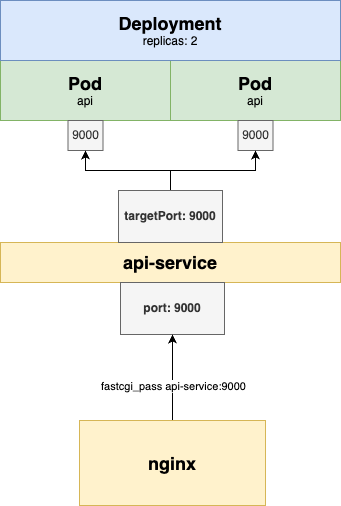
As you can see, the api-service exposes port 9000 to other components in the cluster. It also acts as a load balancer because it balances the traffic among the API pods.
As you might expect, these names are going to be domain names inside the cluster. Just as in docker-compose, you can access the API container from nginx as api:9000. The same thing can be done with Kubernetes as well. The only difference is that now in nginx we cannot reference api since it's the pod's name. We need to use api-service since the service exposes the port.
Change api:9000 to api-service:9000 in the nginx config file:
location ~\.php {
  try_files $uri =404;
  include /etc/nginx/fastcgi_params;
  # api-service:9000 instead of api:9000
  fastcgi_pass api-service:9000;
  fastcgi_index index.php;
  fastcgi_param PATH_INFO $fastcgi_path_info;
  fastcgi_param SCRIPT_FILENAME $document_root$fastcgi_script_name;
}
The next is to add an nginx-service:
apiVersion: v1
kind: Service
metadata:
  name: nginx-service
spec:
  selector:
    app: nginx
  ports:
    - protocol: TCP
      port: 80
      targetPort: 80
It's the same thing it exposes port 80.
Apply the changes to the cluster:
kubectl apply -R -f infra/k8s
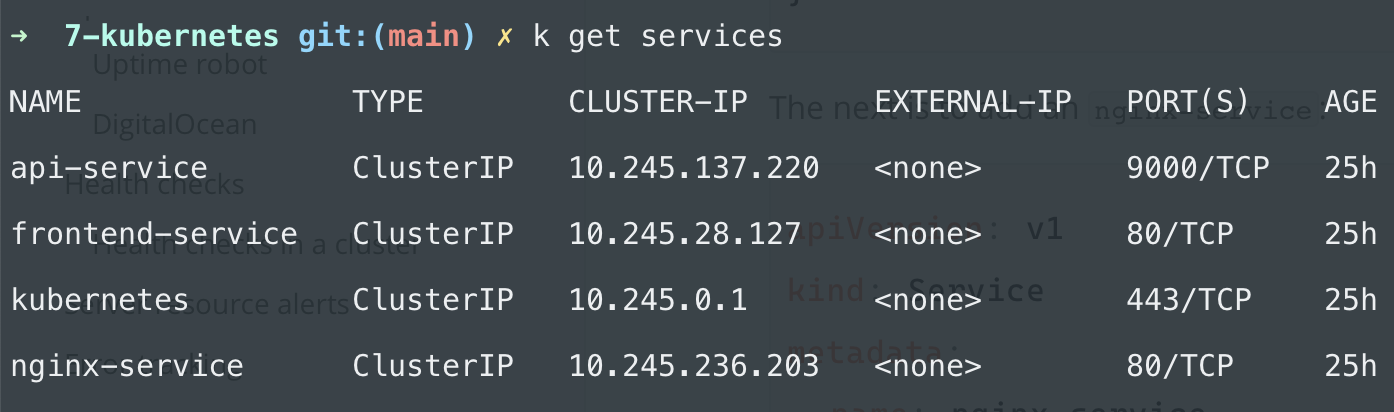
If you now run kubectl get services you should see api-service and nginx-service running:
Right now, there's no way to access the cluster because it's not exposed to the outside world yet. But we can still test the configuration.
You can forward traffic from the cluster to your local machine by running this command:
kubectl port-forward svc/nginx-service 8080:80
You can test if it works by hitting the health-check API:
curl -w "%{http_code}\n" localhost:8080/api/health-check
It should write 200 to your terminal.
You can also check the logs of the nginx pods with kubectl log <nginx-pod-name> and you should see access log entries such as these:

If you don't see the logs it's likely that you run multiple replicas and you access the logs from the wrong replica.
This whole article comes from my new 465-page book called "DevOps with Laravel." In the book, I'm talking about:
- Fundamentals such as nginx, CGI, FastCGI, FPM
- Backup and restore scripts
- Optimization
- CI/CD pipelines
- Log management and monitoring
- Docker and docker-compose
- Docker Swarm
- Kubernetes
- Serverless and PaaS