« back published by Martin Joo on August 6, 2023
DevOps With Laravel: Dockerizing a Laravel application
In this article, I'm going to show you how to dockerize an application that has the following components:
- Laravel API
- Vue SPA frontend
- Worker
- Scheduler
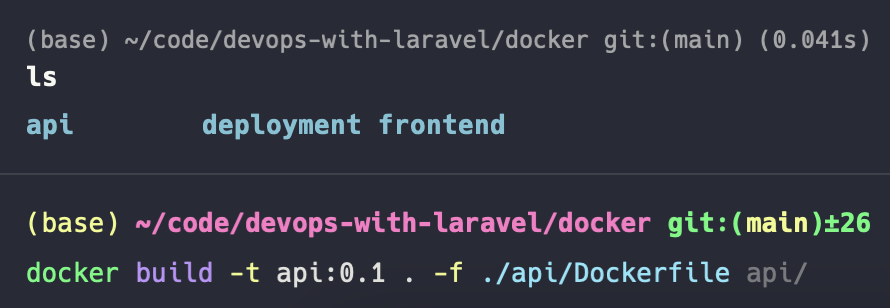
It's a monorepo containing these folders:
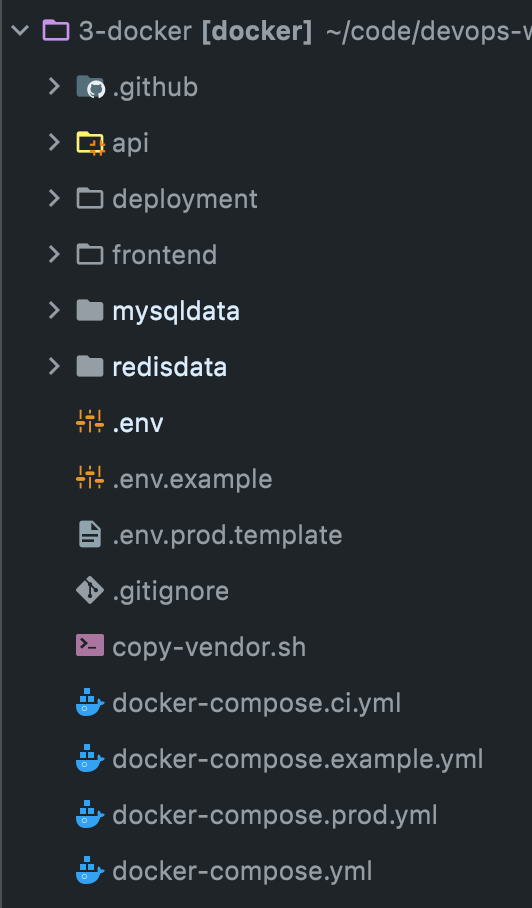
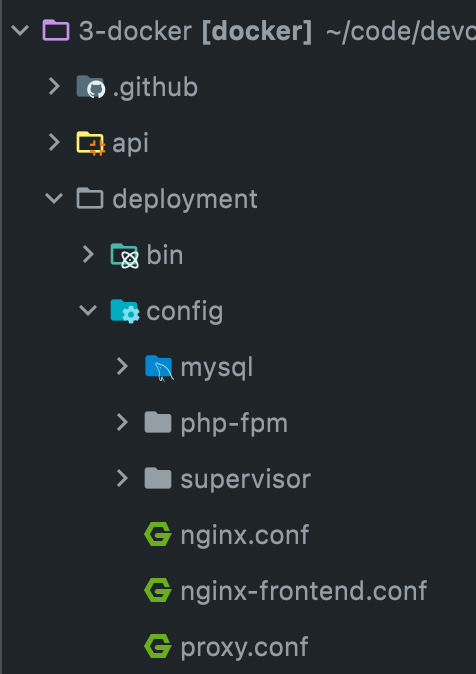
api contains a standard Laravel app. The deployment folder contains some deployment-related scripts and config files:
The basics in theory
Before we start dockerizing the application let me explain what Docker is.
Docker is a platform that allows us to create, deploy, and run applications in containers. Containers are a lightweight and portable way to package software and its dependencies, allowing applications to run consistently across different environments.
The most important thing is: package software and its dependencies.
When you don't use Docker you probably deploy with some shell scripts, and you prepare a new server manually (or running a shell script that install PHP, etc). The application and the deploy script assume that the server already has php, nginx, mysql, gd and so on. This is why you migh have a provision_server.sh script or something similar. It takes care of installing system dependencies on a new server. But this is still not really "portable" or platform-independent since the script has things like this:
wget https://nodejs.org/dist/v14.21.3/node-v14.21.3-linux-x64.tar.xz
apt install php8.1-common php8.1-cli -y
How do you know that the server has wget and apt. For example, apt is the package manager on Debian and Debian-based distros (such as Ubuntu or Mint). It works for us only because we created DigitalOcean droplets with Ubuntu. If your VM has CentOS it would fail because their package manager is yum.
Despite the fact that we can automatically deploy to a specific VM and cloud-provider we still have a problem: the application is not self-contained.
Right now, we're looking at layers such as this:
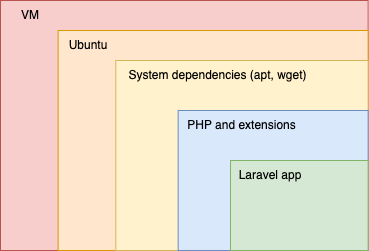
Technically apt or wget is not much different from PHP but they are different from our perspective because we need a specific version of PHP but we probably don't care if the current system has wget 1.14 or 1.13.4
Let's see how much control do we have over those different layers:
- Laravel app: 100% control, we write the code.
- PHP and extensions: the deploy script assumes that there is PHP installed on the server. But who installs it? In this case, when I wrote this article, I choose a specific VM on DigitalOcean that already has PHP. It was PHP8.0 but the app needs 8.1 so I updated PHP in the
provision_serverscript I wrote. Can you run the same script on a server with no PHP? I don't know. The deploy script I prepared also assumes that nginx is installed. This is because of the specific VM type I choose. It comes with nginx. For this reason, I left out the nginx installation from theprovision_serverscript. So my current deployment process only works on a server that has nginx pre-installed on it! I locked into a specific VM image on DigitalOcean. Of course, you can add nginx to the provision script. - System dependencies: I just assumed it's an Ubuntu system with apt, wget, git, sed, ufw, php, mysql, curl, unzip installed on it. And I'm not even talking about the specific version numbers. Certainly, you can add all of these to the provision script if you have a free weekend.
- Ubuntu: I haven't even considered the specific version number in my script. I just went with the one on DigitalOcean VMs and it worked.
- VM: we don't know much about the specific hardware but fortunately we don't need to.
As you can see, there are some areas where we are "out of control." Or in other words: the application is not self-contained. It has lots of moving parts. And if you think about the development process as well it gets even more clunky. Developers have Mac, Linux, and Windows machines. Everyone needs to manually install the right PHP version, extensions and so on.
Fortunately, with Docker, the whole situation looks like this:
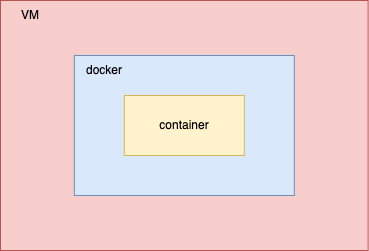
It takes everything from the OS to your Laravel source code and packages it into one container. It only needs a machine that has Docker installed on it.
Here are the fundamental concepts of docker:
- Dockerfile: It's something like a mixture of a config file and shell scripts. When I was preparing the article I created an Ubuntu-based VM on DigitalOcean then ran the provision script that installed some dependencies such as php8.1 or nodejs. In the Docker world, we do these steps inside a Dockerfile. I'm going to explain it in more detail but here's a pretty simple example:
FROM php:8.1.0-fpm

RUN apt-get install git
This config describes a Linux-based image that has PHP, fpm, and git. FROM and RUN comes from Docker syntax, while apt-get install is just a Linux command.
- Image: An image is like an ISO file was lots of years ago. We have a Dockerfile and then we can build an image from it. For example, if you build the Dockerfile above Docker will create an image that contains every file, folder, and dependency required by Linux, PHP, and git. In this example, PHP8.1 is the base image (the
FROMpart) which is stored in Docker Hub so Docker will download it, and run the commands (theRUNpart). These commands will also download files from the internet. Finally, everything is stored in a new image stored on your local machine. - Container: A container is a running instance of an image. It's like when you actually mount and play the ISO file. It's an isolated environment that contains everything needed to run an application, including code, libraries, and system tools.
So a Dockerfile is a blueprint that describes your application and its environment (including the operating system). An image is a collection of files and folders based on that blueprint. And a container is a running instance of an image.
And as you might guess images can inherit from each other just like classes in PHP. In this example, the first line means that we want to use the official PHP8.1 image stored in Docker Hub. And the official PHP image uses an official Linux image.
Virtual machines vs containers
If a running container has its own Linux than it's a virtual machine, right? Almost, but no. The main difference is that virtual machines emulate an entire operating system, including the kernel, which can be resource-intensive. In contrast, Docker containers share the host operating system kernel, which makes them much faster and more efficient than virtual machines. Containers are much smaller and faster to start up than virtual machines.
And also this is the reason (the sharing of host OS kernel) that Docker did not really worked on Windows for a long time. Years ago only the pro version of Windows was able to run Docker (not very stable though). And even nowadays you need WSL which is basically a virtual Linux.
This whole article comes from my new 465-page book called DevOps with Laravel. In the book, I'm talking about:
- Fundamentals such as nginx, CGI, FastCGI, FPM
- Backup and restore scripts
- Optimization
- CI/CD pipelines
- Log management and monitoring
- Docker and docker-compose
- Docker Swarm
- Kubernetes
- Serverless and PaaS
- ...and more
The basics in practice
Let's start with running an index.php script from a container. The script looks like this:
<?php

echo 'Hi mom!';
As I mentioned earlier, every major vendor such as PHP, nginx or MySQL has an official Docker image we can use. These images contain some Linux distro, every system dependency that the vendor needs, and the actual product. In our case, it's going to be PHP 8.1:
FROM php:8.1-cli
The FROM command defines the base image. Every image has a name and a version number in the format of <vendor>:<version> The version number is called tag. These images and tags can be found on Docker Hub.
As you can see, in this case the tag is not only the version number but 8.1-cli. CLI means that you can use this PHP image to run CLI script such as my "Hi mom!" script. You cannot use a CLI image to server requests through a web server. For this, we're gonna use another tag.
As I mentioned earlier, a Docker image is just a collection of files and folders. So let's put some files into it:
FROM php:8.1-cli

COPY ./index.php /usr/src/my-app/index.php
The COPY command copies files from your local machine to the Docker image. In this case, the index.php needs to be in the folder as the Dockerfile we're writing right now:
- my-app
- index.php
- Dockerfile
So this command copies the index.php from your local machine to the Docker image inside the /usr/src/my-app folder.
After that, we can define a "working directory:"
FROM php:8.1-cli

COPY ./index.php /usr/src/my-app/index.php

WORKDIR /usr/src/my-app
It's basically a cd command. So any command we issue after the WORKDIR will run in the /usr/src/my-app folder.
And the last part is:
FROM php:8.1-cli

COPY ./index.php /usr/src/my-app/index.php

WORKDIR /usr/src/my-app

CMD [ "php", "./index.php" ]
CMD runs any CLI command in a weird syntax, where every argument is a new entry in an array. So this is equivalent to this: php ./index.php. Remember, the current working directory is /usr/src/my-app where index.php is located so ./index.php is a valid path.
So we have the blueprint for the image. Now let's build it:
docker build -t hi-mom:0.1 .
docker build: This is the command to build a Docker image.-t hi-mom:0.1: This option tags the image with the name "hi-mom". The name can be anything you choose, but it's typically in the format of "repository:tag". In fact, it's the format of "registry/repository:tag" but we haven't talked about registries..: This specifies the build context, which is the location of the Dockerfile and any files it references. In this case, we're using the current directory as the build context because it contains both the Dockerfile andindex.phpas well.
After running the command you should see something like that:

If you run the docker images command you should see an image called hi-mom:

As you can see, the size is 524MB because Linux (Debian), PHP, and all of the dependencies takes up that much space.
To run the image and create a running container out of it all you need to do is:
docker run hi-mom:0.1
And you can see the output:
So these are the basics of running a Docker container. This image contains a single command that runs a script that executes and exits immediately. So it has no long-running processes. Of course, when we want to serve an API via nginx or run 8 worker processes managed by supervisor we need some more advanced Dockerfiles.
Overview of the application
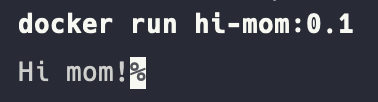
To dockerize the sample application we need the following architecture:
Each box is a container and they have the following responsibilities:
- nginx for FE serves the static files of the Vue frontend
- nginx for API: this nginx instance accepts requests from the Vue app
- Laravel API with FPM: this is where the application lives. nginx forwards HTTP requests to this container, FPM accepts them, and finally it forwards them to our Laravel app.
- MySQL has a separated container using the official MySQL image
- The scheduler container contains the same Laravel code as "Laravel API with FPM" container. But instead of running PHP FPM, this container will run
php artisan schedule:runonce every 60 seconds. Just like you usecrontabon a Linux server. Scheduler might dispatch queue jobs, and it might also need the database for various reasons. - The worker container is similar to the scheduler but it runs the
php artisan queue:workcommand so it will pick up jobs from the queue. It also contains the source code, since it runs jobs. - And finally we have a container for Redis. Just like MySQL it uses the official Redis image.
This is the basic architecture of the application. Later, I'm gonna scale containers, use nginx to load balance, use supervisor to scale workers but for now the goal is to dockerize everything and use docker-compose to orchestrate the containers.
Dockerizing a Laravel API
Let's start by writing a Dockerfile to the Laravel API:
FROM php:8.1-fpm

WORKDIR /usr/src
The base image is php:8.1-fpm. You can use any version you want, but it's important to use the FPM variant of the image. It has PHP and PHP-FPM preinstalled. You can check out the official Dockerfile here.
In Dockerfiles, I used to use /usr/src as the root of the project. Basically you can use almost any folder you'd like to. Some other examples I encountered with:
/usr/local/src/application/laravel/var/www/var/www/html
The next step is to install system packages:
RUN apt-get update && apt-get install -y \
    libpng-dev \
    libonig-dev \
    libxml2-dev \
    libzip-dev \
    git \
    curl \
    zip \
    unzip \
    supervisor \
        default-mysql-client
First, we run an apt-get update and then installing the following libs:
libpng-devis needed to deal with PNG files.libonig-devis the Oniguruma regular expression library.libxml2-devis a widely-used XML parsing and manipulation library written in C.libzip-devdeals with ZIP files.
These libs are C program and needed by PHP or a particular composer package or Laravel itself. Other than these low-level libs we install standard user-facing programs such as: git, curl, zip, unzip, supervisor. default-mysql-client contains mysqldump which is required by laravel-backup.
After installing packages, it's recommended to run these commands:
RUN apt-get clean && rm -rf /var/lib/apt/lists/*
apt-get cleancleans the cache memory of downloaded package files.rm -rf /var/lib/apt/lists/*removes the lists of available packages and their dependencies. They're automatically regenerated the next timeapt-get updateis run.
The great thing about the official PHP image (compared to starting from Debian and installing PHP manually) is that it has a helper called docker-php-ext-install. It can be used to install PHP extensions very easily:
RUN docker-php-ext-install pdo_mysql mbstring exif pcntl bcmath gd zip
By the way, docker-php-ext-install is a simple shell script included in the official image.
This installs the following extensions:
-
pdo_mysqlis used by Laravel to interact with databases. PDO stand for PHP Data Objects which is another PHP extension that ships with PHP by default. -
mbstringstands for "multibyte string" and provides functions for working with multibyte encodings in PHP. Long time ago one character was one exactly byte. But nowadays, when we have UTF8 characters require more than 1 byte. Hence the name multibyte string. -
exifprovides functions for reading and manipulating metadata embedded in image files. -
pcntlis used for managing processes and signals. -
bcmathis a PHP extension that provides arbitrary precision arithmetic functions for working with numbers that are too large or too precise to be represented using the standard floating-point data type. -
gdhandles in various formats, such as JPEG, PNG, GIF, and BMP. It is required to create PDFs as well. -
And finally
zipis pretty self-explanatory.
docker-php-ext-install can only install PHP core libraries. Usually, the low-level ones. If you need something else you can use PECL:
RUN pecl install redis
In this example, I'm going to use Redis as a queue so we need to install it.
In a Dockerfile we also have another, kind of unusual but pretty fast way of installing stuff: copying the binary from another Docker image:
COPY /usr/bin/composer /usr/bin/composer
There's a --from option to the COPY command in which we can specify from which Docker image we want to copy files. Composer also has an official image. If you run the image
docker run --rm -it composer:2.5.8
you can find the composer executable file in the /usr/bin directory. The COPY --from=composer:2.5.8 /usr/bin/composer /usr/bin/composer downloads that file from the composer image and copies it into our own image.
The next line copies the source code form the host machine to the container:
COPY . .
. means the current working directory which is /usr/src in the image.
And finally we can copy our PHP and FPM config files. If you remember the project has this structure:
- api
- Dockerfile
- frontend
- deployment
- config
The config files are located in deployment/config and right now I'm editing the api/Dockerfile file. So the COPY command looks like this:
COPY ../deployment/config/php-fpm/php.ini /usr/local/etc/php/conf.d/php.ini
COPY ../deployment/config/php-fpm/www.conf /usr/local/etc/php-fpm.d/www.conf
But this would fail miserably if you run a docker build from the api folder, such as this: docker build -t api:0.1 .
The result is this:
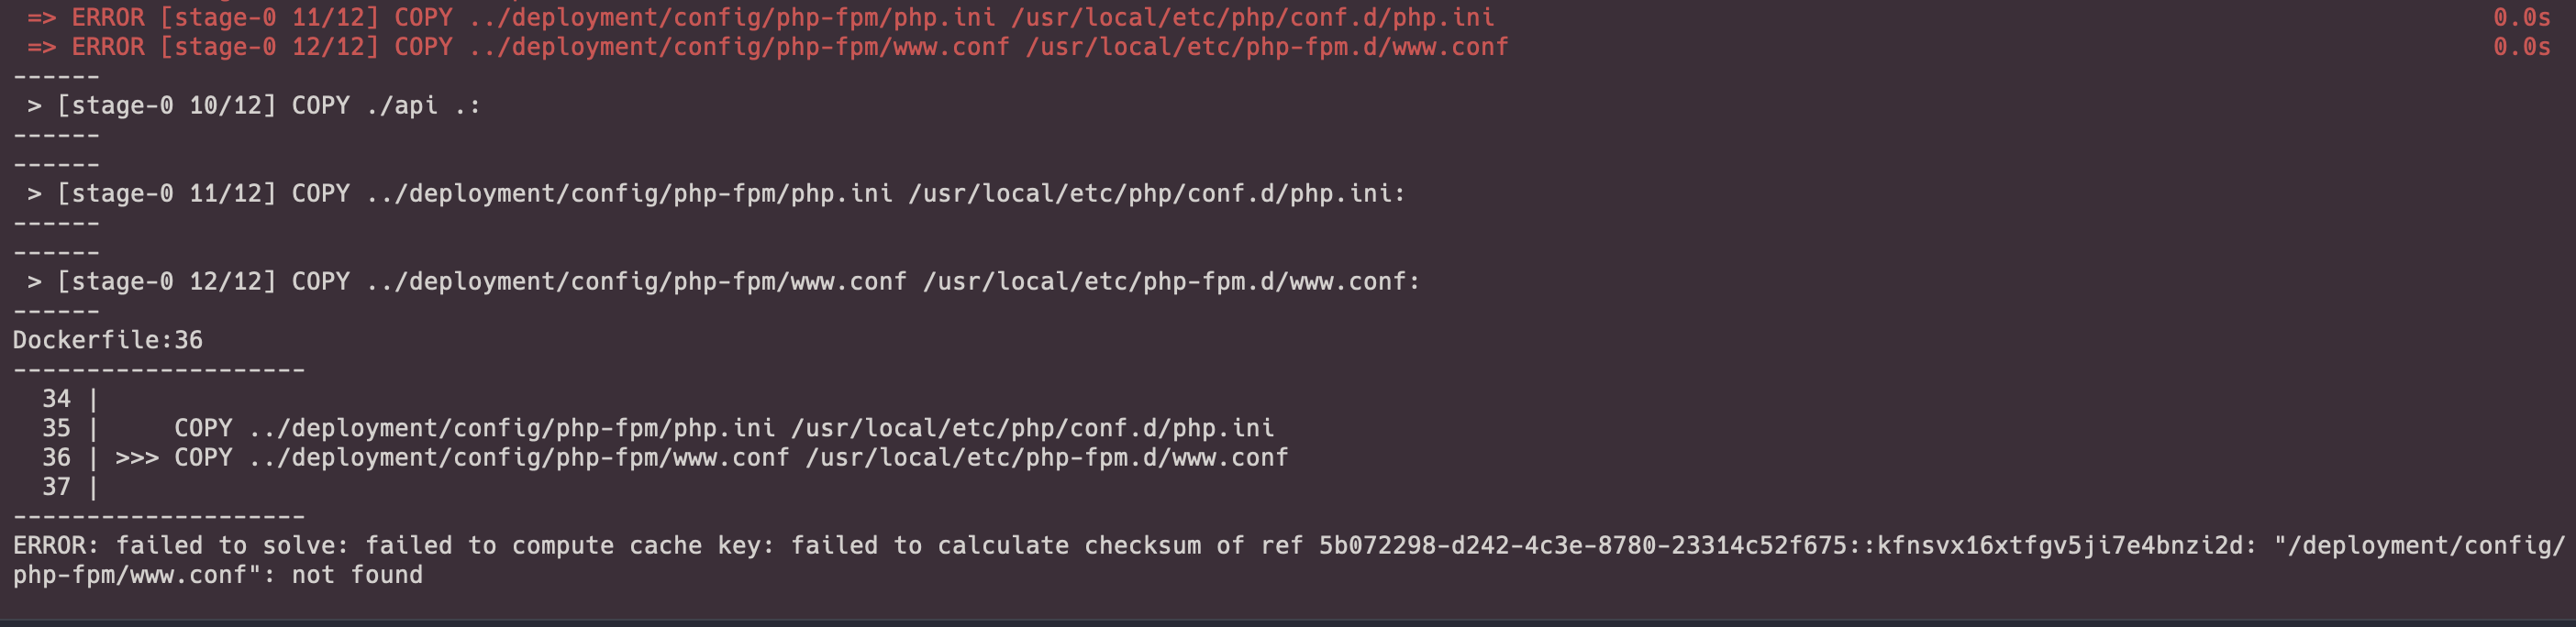
The reason is that in a Dockerfile you cannot reference folders outside the current working directory. So ../deployment does not work.
One solution is to move the Dockerfile up:
- api
- frontend
- deployment
- Dockerfile
But this solution is confusing since frontend will also have its own Dockerfile. And of course we might have another services with their own Dockerfiles. So I really want to store this file in the api folder.
Another solution is to leave the Dockerfile in the api folder but when you build it (or use it in docker-compose) you set the context to the root directory. So you don't build it the api but the parent directory:
There are three arguments to this command:
-t api:0.1sets the image tag.-f ./api/Dockerfilesets the Dockerfile we want to build the image from..is the context. So it's not theapibut the current (root) folder.
With a setup like this, we can rewrite the COPY commands:
COPY ./api .

COPY ./deployment/config/php-fpm/php.ini /usr/local/etc/php/conf.d/php.ini
COPY ./deployment/config/php-fpm/www.conf /usr/local/etc/php-fpm.d/www.conf
COPY . . becomes COPY ./api . because we are one folder above so the source code is located in ./api. And the same goes for the deployment folder as well which became ./deployment instead ../deployment.
Now the image can be built successfully. However, we don't need to manually build images right now.
The last thing is installing composer packages after the project file have been copied:
COPY ./api .

RUN composer install
It's an easy but an important step. Now the image is entirely self-contained, meaning it has:
- Linux
- PHP
- System dependencies
- PHP extensions
- Project files
- Project dependencies
And this is the final result:
FROM php:8.1-fpm
WORKDIR /usr/src
RUN apt-get update && apt-get install -y \
git \
curl \
libpng-dev \
libonig-dev \
libxml2-dev \
libzip-dev \
zip \
unzip \
supervisor
RUN apt-get clean && rm -rf /var/lib/apt/lists/*
RUN docker-php-ext-install pdo_mysql mbstring exif pcntl bcmath gd zip
RUN pecl install redis
COPY /usr/bin/composer /usr/bin/composer
COPY ./api .
RUN composer install
COPY ./deployment/config/php-fpm/php.ini /usr/local/etc/php/conf.d/php.ini
COPY ./deployment/config/php-fpm/www.conf /usr/local/etc/php-fpm.d/www.conf
To summarize:
- It extends the official PHP 8.1 FPM image.
- We install some basic dependencies that are needed by Laravel, the app itself, and the composer packages it uses.
- We install the necessary PHP extensions, Redis, and composer.
- Then we copy files from the host machine into the image.
Before we move on let's build it and run it. The build command is the same as before. Remember, you need to run it from the project root folder (where the api folder is located):
docker build -t api:0.1 . -f ./api/Dockerfile
If you now run the docker images command you should see the newly build image:

To run the image execute the following command:
docker run -it --rm api:0.1
There are two important flags here:
-itwill start an interactive shell session inside the container. Theiflag stands for interactive, which keeps STDIN open, and thetflag stands for terminal, which allocates a pseudo-TTY. This means that you can interact with the container's shell as if you were using a local terminal.--rmwill automatically remove the container when it exits. Otherwise Docker would keep the container in astoppedstatus. Removing means more free space on your disk.
After running the command you should see something like this:
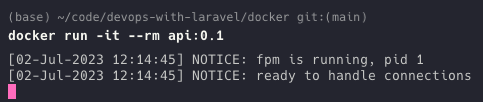
As you can see it started PHP-FPM. But why? Our Dockerfile doesn't do anything except copying files from the host.
If you check out the php8.1-fpm image you can see it ends with these two commands:
EXPOSE 9000
CMD ["php-fpm"]
CMD is pretty similar to RUN. It runs a command, which is php-fpm in this case. However, there's a big difference between RUN and CMD:
RUNis used to execute commands during the build process of an image. This can include installing packages, updating the system, or running any other command that needs to be executed to set up the environment for the container. Just as we did.CMD, on the other hand, is used to define the default command that should be executed when a container is started from the image. This can be a shell script, an executable file, or any other command that is required to run the application inside the container.p
Since the official PHP image contains a CMD ["php-fpm"] command our image will inherit this and run php-fpm on startup. Of course we can override it with another CMD in our own Dockerfile but we don't need to right now.
There's another command in the PHP image:
EXPOSE 9000
It means that the container exposes port 9000 to the outside world. We can verify this by running docker ps:

You can see 9000/tcp is exposed from the container. Right now, we don't need to use it, but later it's going to be very important. This is the port where FPM can be reached by nginx.
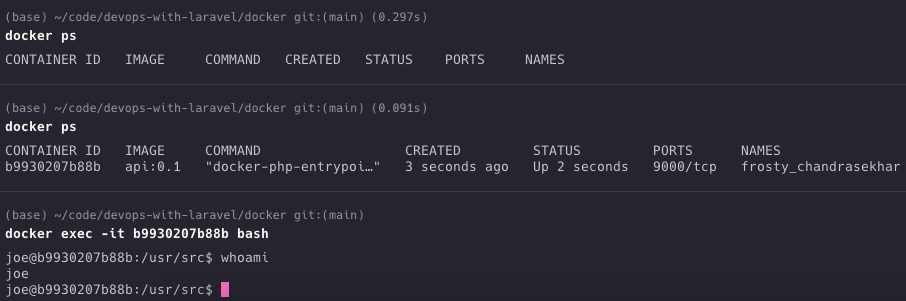
docker ps also gives us the container ID which we can use to actually go inside the container:
docker exec -it 31c75e572b07 bash
With docker exec you can run command inside your containers. In this example, I run the bash command in interactive mode (-it) which essentially gives me a terminal inside the container where I can run commands such as ls -la:
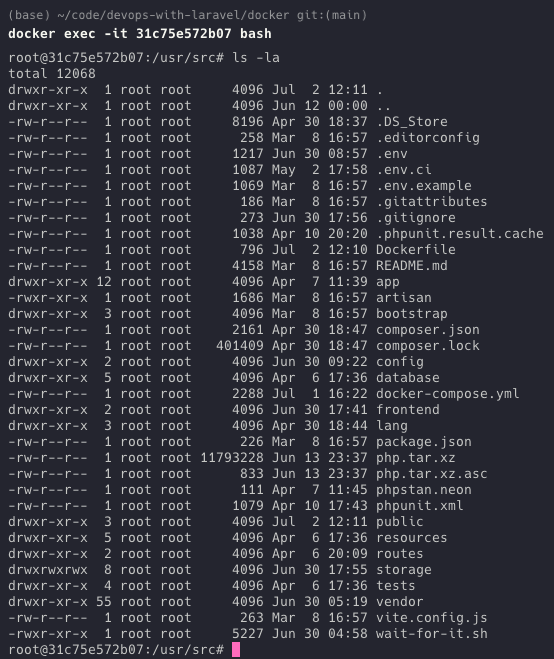
As you can see, we are in the /usr/src directory and the project's files are copies successfully. Here you can run commands such as composer install or php artisan tinker.
There's only one problem, though:
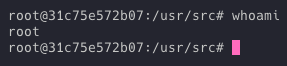
We are running the container as root. Which is not a really good idea. It can pose a security risk. When a container runs as root, it has root-level privileges on the host system, which means that it can potentially access and modify any file or process on the host system. This can lead to accidental or intentional damage to the host system.
It can also cause annoying bugs. For example, if the storage directory doesn't have 777 permissions and is owned by root, Laravel is unable to write into the log files, etc.
By default, Docker containers run as the root user, but it is recommended to create a new user inside the container. So let's do that!
RUN useradd -G www-data,root -u 1000 -d /home/martin martin
This is how you create a new user in Linux:
-G www-data,rootadds the user to two groups,www-dataandroot. If you search forwww-datain the fpm Dockerfile you can see that FPM is running aswww-dataand this user is in thewww-datagroup. So it's important that our own user is also part of that group.-u 1000specifies the user ID for the new user. UID is really just an integer number, 1000 is not special at all but it is commonly used as the default UID for the first non-root user created on a system. The UID 0 is reserved for root.-d /home/martinsets the home directory.martinis the name of my user.
After that we need to run this:
RUN mkdir -p /home/martin/.composer && \
    chown -R martin:martin /home/martin && \
    chown -R martin:martin /usr/src
It creates a folder for composer and then sets the ownerships of the home and /usr/src directories to the new user.
And at the end of the Dockerfile we need to specify that the container should run as martin:
USER martin
These commands need to run before we copy files into the container, so the new Dockerfile looks like this:
FROM php:8.1-fpm
WORKDIR /usr/src
RUN apt-get update && apt-get install -y \
git \
curl \
libpng-dev \
libonig-dev \
libxml2-dev \
libzip-dev \
zip \
unzip \
supervisor
RUN apt-get clean && rm -rf /var/lib/apt/lists/*
RUN docker-php-ext-install pdo_mysql mbstring exif pcntl bcmath gd zip
RUN pecl install redis
COPY /usr/bin/composer /usr/bin/composer
RUN useradd -G www-data,root -u 1000 -d /home/martin martin
RUN mkdir -p /home/martin/.composer && \
chown -R martin:martin /home/martin && \
chown -R martin:martin /usr/src
COPY ./api .
RUN composer install
COPY ./deployment/config/php-fpm/php.ini /usr/local/etc/php/conf.d/php.ini
COPY ./deployment/config/php-fpm/www.conf /usr/local/etc/php-fpm.d/www.conf
USER martin
Let's build a new image and then check the output of whoami again:

Now the container's running as martin.
This should be perfectly fine, however, we can make the whole thing dynamic. So we don't need to hardcore the user martin in the Dockerfile but rather we can use build arguments. To do that, we need to add two lines at the beginning of the file:
FROM php:8.1-fpm

WORKDIR /usr/src

ARG user
ARG uid
These are called build arguments but they really just variables. We can pass anything when building the image (or later, running the image from docker-compose) and we can reference it in the Dockerfile:
RUN useradd -G www-data,root -u $uid -d /home/$user $user

RUN mkdir -p /home/$user/.composer && \
    chown -R $user:$user /home/$user && \
    chown -R $user:$user /usr/src

COPY ./api .

RUN composer install

COPY ./deployment/config/php-fpm/php.ini /usr/local/etc/php/conf.d/php.ini
COPY ./deployment/config/php-fpm/www.conf /usr/local/etc/php-fpm.d/www.conf

USER $user
If you now run the same docker build -t api:0.1 . -f ./api/Dockerfile command it fails with this error message:
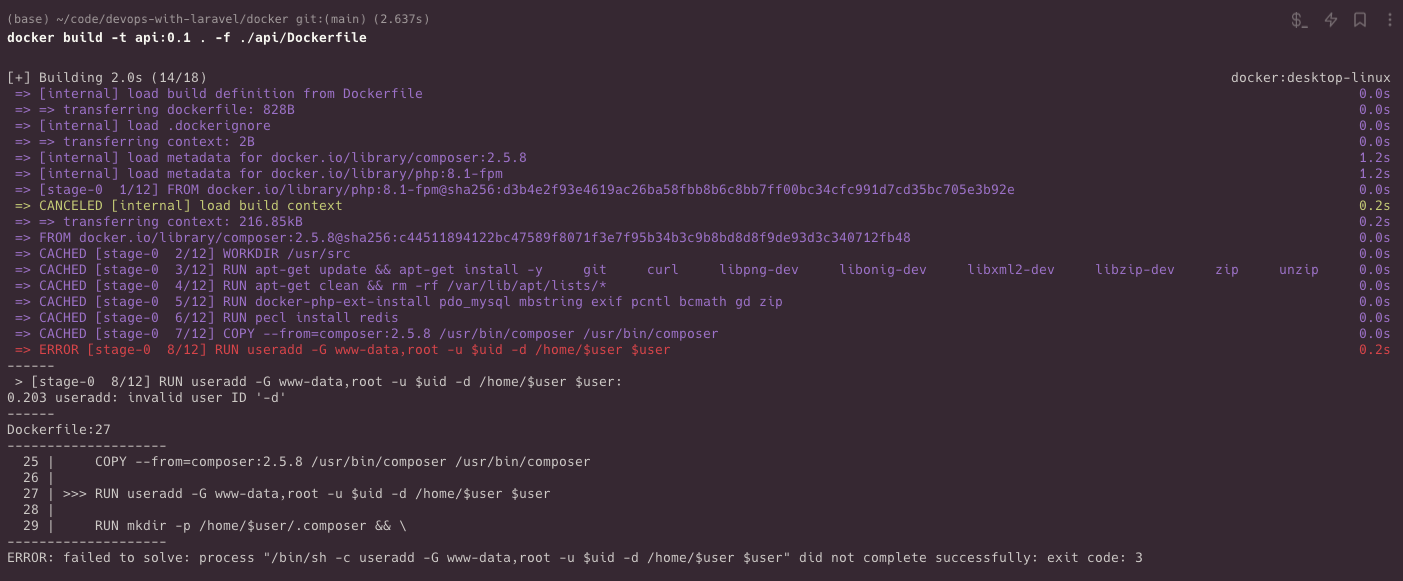
The command useradd failed with an invalid user ID since we didn't pass it the docker build. So this is the correct command:
docker build -t api:0.1 -f ./api/Dockerfile --build-arg user=joe --build-arg uid=1000 .
After building and running the image, you can see it's running as joe:
So this is the final Dockerfile for the Laravel API:
FROM php:8.1-fpm
WORKDIR /usr/src
ARG user
ARG uid
RUN apt-get update && apt-get install -y \
git \
curl \
libpng-dev \
libonig-dev \
libxml2-dev \
libzip-dev \
zip \
unzip \
supervisor
RUN apt-get clean && rm -rf /var/lib/apt/lists/*
RUN docker-php-ext-install pdo_mysql mbstring exif pcntl bcmath gd zip
RUN pecl install redis
COPY /usr/bin/composer /usr/bin/composer
RUN useradd -G www-data,root -u $uid -d /home/$user $user
RUN mkdir -p /home/$user/.composer && \
chown -R $user:$user /home/$user && \
chown -R $user:$user /usr/src
COPY ./api .
RUN composer install
COPY ./deployment/config/php-fpm/php.ini /usr/local/etc/php/conf.d/php.ini
COPY ./deployment/config/php-fpm/www.conf /usr/local/etc/php-fpm.d/www.conf
USER $user
After all, it wasn't that complicated.
Dockerizing a Vue app
Now, we can move on to the Vue app. Just as with bare bone nginx and shell script the frontend is significantly easier than the backend. But there are a big difference between the two. When running the API it doesn't matter if you're in production or in development. The Dockerfile is the same, the PHP version is the same, and the project is the same. In the case of the Vue app there's a difference between production and development. In prod, you want to build your assets and serve static files. On the other hand, in development you want to run npm run serve that watches your file changes.
Let's start with production and we can figure out what to do in development mode.
FROM node:14.21.3-alpine
WORKDIR /usr/src
Building the project requires nodejs so this is the base image. Once again, I'm using the /usr/src as the root of the project.
Next we need to install npm packages:
COPY ./frontend/package.* ./
RUN npm install
First, it copies package.json and package-lock.json into the container then it runs npm install. You can see I reference ./frontend/package.* instead of ./package.*. in a minute, you'll see why.
After we installed the npm packages we can copy the source code and build it:
COPY ./frontend .
RUN npm run build
This is what it looks like so far:
FROM node:14.21.3-alpine
WORKDIR /usr/src
COPY ./frontend/package.* ./
RUN npm install
COPY ./frontend .
RUN npm run build
Now we have the /usr/src/dist folder with all the static files in it. The last step is to serve it via nginx. So we need to install and configure nginx manually.
Actually not. We don't need to install nginx. There's a much better solution in Docker called multi stage builds.
Image something like this:
FROM node:14.21.3-alpine AS build
# ...
RUN npm run build
FROM nginx:1.25.1-alpine AS prod
COPY /usr/src/dist /usr/share/nginx/html
A few important things going on here. We have multiple FROM expressions each with an "alias" using the AS expression. They are called stages. In a multi-stage Docker build, you define multiple build stages, just like build and prod, each with its own set of instructions. Each stage can use a different base image and can copy files from previous stages.
The main advantage is that we can use different base images. This is why we don't need to install and configure nginx. We just use the official nginx image with a fresh installation in it and use it!
The first stage (build) ends with an npm run build command that generates a lot of files inside the usr/src/dist folder. The second stage (prod) can just grab these files and paste them into a folder that is configured in an nginx config (which we'll see in a minute).
So after we have the build all we need to do is to start nginx:
FROM nginx:1.25.1-alpine AS prod
COPY /usr/src/dist /usr/share/nginx/html
COPY ./deployment/config/nginx-frontend.conf /etc/nginx/nginx.conf
EXPOSE 80
CMD ["nginx", "-g", "daemon off;"]
On the last line we override the default command of the image with nginx -g daemon off. By default, when you start nginx using the nginx command, it runs as a background process, detaching from the shell.
However, when running a docker container it needs a long running process. Otherwise it will exit. daemon off means that nginx runs in the foreground. It's a long-running process that "keeps the container alive." The -g option allows you to pass a configuration directive to nginx.
So, when you run nginx -g daemon off, it starts up and runs in the foreground, outputting log messages and other information to your terminal session. And more importantly, keeping the container in a running state.
As you can see, we copy the nginx-frontend.conf file from the deployment folder. Once again, this is the reason we're referencing the source as ./frontend instead of . The same as before with the backend. Of course, you can move these config files directly into the api and frontend folders but I like them in a separate directory with all the shell script and other deployment-related stuff.
Here's the nginx config:
worker_processes auto;

events {
  worker_connections 1024;
}

http {
  access_log /var/log/nginx/access.log;
  error_log /var/log/nginx/error.log;
  include /etc/nginx/mime.types;

  gzip on;
  gzip_comp_level 4;
  gzip_types text/css application/javascript image/jpeg image/png;

  server {
    server_name posts.today www.posts.today;
    listen 80;
    root /usr/share/nginx/html;
    index index.html;

    location / {
      try_files $uri $uri/ /index.html;
      gzip_static on;
    }

    location ~* \.(css|js|png|jpg|gif|ico)$ {
      access_log off;
      add_header Cache-Control public;
      add_header Vary Accept-Encoding;
      expires 1d;
    }
  }
}
You've already seen configuration such as this so there's nothing new here. There's no SSL yet. Since the official Vue documentation uses the /usr/share/nginx/html folder as the root, I just stick to the same folder in my Dockerfiles.
The last thing we need to do is the development image. If you think about it, all we need is this:
FROM node:14.21.3-alpine AS base
WORKDIR /usr/src
COPY ./frontend/package.* ./
RUN npm install
COPY ./frontend .
CMD ["npm", "run", "serve"]
So it's just the base stage but instead of npm run build we need npm run serve. To do so we can extract a brand new stage:
FROM node:14.21.3-alpine AS base
WORKDIR /usr/src
COPY ./frontend/package.* ./
RUN npm install
COPY ./frontend .

FROM base AS dev
EXPOSE 8080
CMD ["npm", "run", "serve"]

FROM base AS build
RUN npm run build
baseinstalls dependencies and copies filesdevstarts a development server.buildrunsnpm run build
The dev stage also exposes the port 8080. This is the default port used by vue-cli-service serve (which is the underlying command being run by npm run serve).
And after all that we can include the prod stage that copies the files from the stage build:
FROM nginx:1.25.1-alpine AS prod
COPY /usr/src/dist /usr/share/nginx/html
COPY ./deployment/config/nginx-frontend.conf /etc/nginx/nginx.conf
EXPOSE 80
CMD ["nginx", "-g", "daemon off;"]
The whole Dockerfile looks like this:
FROM node:14.21.3-alpine AS base
WORKDIR /usr/src
COPY ./frontend/package.* ./
RUN npm install
COPY ./frontend .
FROM base AS dev
EXPOSE 8080
CMD ["npm", "run", "serve"]
FROM base AS build
RUN npm run build
FROM nginx:1.25.1-alpine AS prod
COPY /usr/src/dist /usr/share/nginx/html
COPY ./deployment/config/nginx-frontend.conf /etc/nginx/nginx.conf
EXPOSE 80
CMD ["nginx", "-g", "daemon off;"]
If you now want to build a dev image you do so by running this:
docker build -t frontend:0.1 -f ./frontend/Dockerfile --target=dev .
There's a target option to the build command that targets a specific stage from the Dockerfile. In this case, the build ends at this line: CMD ["npm", "run", "serve"]
If you target the dev stage and run the image you'll get this result:
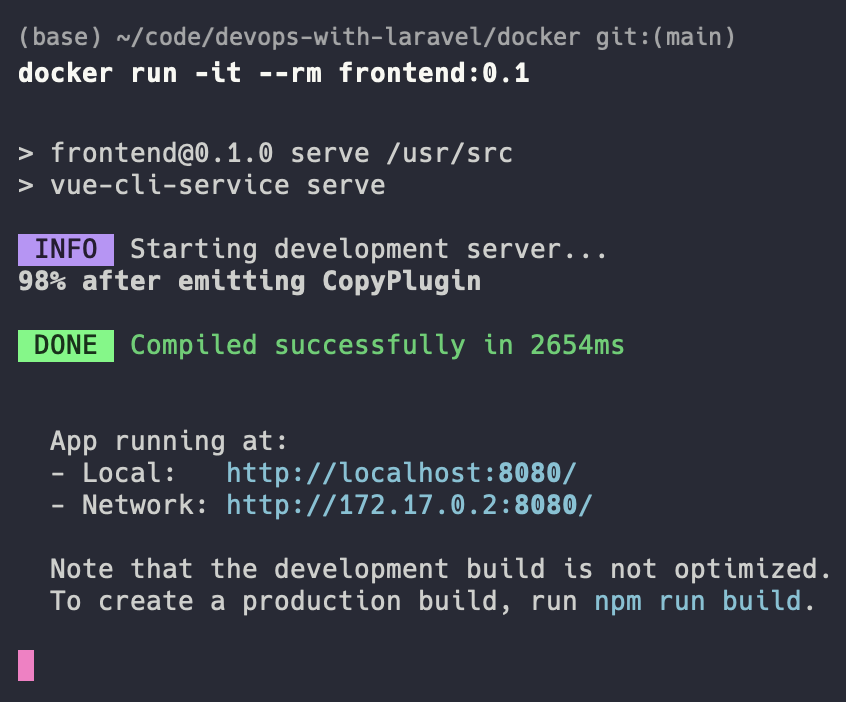
It starts a development server. However, if you target the prod stage:
docker build -t frontend:0.1 -f ./frontend/Dockerfile --target=prod .
You'll get this output:
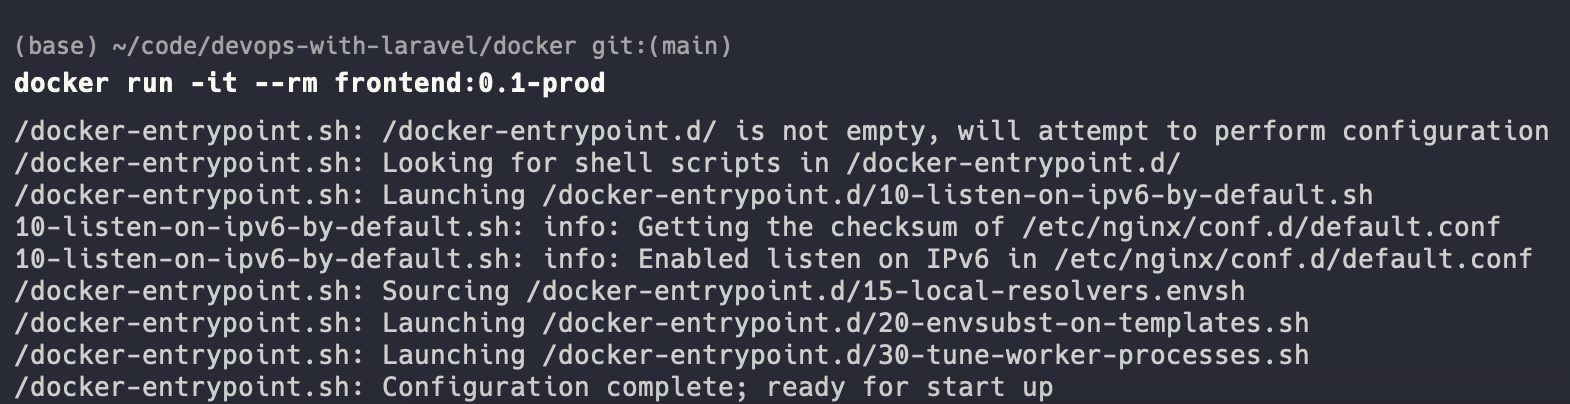
It's a running nginx instance.
Dockerizing a scheduler and a worker
I have good news. The scheduler needs the same Dockerfile as the API. It's the same Laravel application but instead of HTTP requests it cares about console commands. The worker also needs the same Dockerfile. So, we don't need to do much.
There's only one difference.
- The worker runs this command as its entrypoint:
nice -n 10 php /usr/src/artisan queue:work --tries=3 --verbose --timeout=30 --sleep=3 --rest=1 --max-jobs=1000 --max-time=3600 - And the scheduler runs this:
nice -n 10 sleep 60 && php /usr/src/artisan schedule:run --verbose --no-interaction. It executesschedule:runevery 60 seconds.
We can handle this in (at least) two ways:
- Adding two new stages to the existing Dockerfile where we override the default php-fpm command with those commands.
- Not touching the Dockerfile and adding these commands to the
docker-compose.ymlfile (which we don't have yet).
Both of them are good options, but I prefer the first one. In my opinion, it's always a good idea to be independent of the orchestration platform and be as self-contained as possible. So let's do the first one.
We need two more stages at the end of the API Dockerfile:
FROM api AS worker
CMD ["/bin/sh", "-c", "nice -n 10 php /usr/src/artisan queue:work --tries=3 --verbose --timeout=30 --sleep=3 --rest=1 --max-jobs=1000 --max-time=3600"]

FROM api AS scheduler
CMD ["/bin/sh", "-c", "nice -n 10 sleep 60 && php /usr/src/artisan schedule:run --verbose --no-interaction"]
The -c option tells the shell to read the command that follows as a string and execute it as a command.
And of course I added the alias at the beginning of the Dockerfile as well:
FROM php:8.1-fpm as api
When you have no target (wanna build the API itself) Docker builds the base stage and inherits the default command (CMD) from the base php:8.1-fpm image.
But of course, if you target the worker stage you'll get an image that runs queue:work:
docker build -t api:0.1 . -f ./api/Dockerfile --build-arg user=joe --build-arg uid=1000 --target=worker
And that's it! We just dockerized everything in the application. I mean, we still have a few components, such as MySQL, Redis, and an nginx for the API. But we don't need to "dockerize" these. These are only external services. We'll use official images in a docker-compose config.
This whole articles comes from my new 465-page book called "DevOps with Laravel." In the book, I'm going to show you how to:
- Build Docker images in a pipeline
- Run them in production
- How to use docker-compose
- How to run your app in a 100-machine cluster using Docker Swarm
- How to migrate into highly-available Kubernetes clusters
- And lots of other things...